
HTML stands for Hypertext Markup Language, and it is the most widely used language to write Web Pages. In 1989, Tim Berners-Lee of Switzerland that used a special type of language to create World-Wide-Web pages and named them Hypertext Markup Language(HTML).
Hypertext refers to the way in which Web pages (HTML documents) are linked together. Thus, the link available on a webpage is called Hypertext.
As its name suggests, HTML is a Markup Language which means you use HTML to simply "mark-up" a text document with tags that tell a Web browser how to structure it to display.
Originally, HTML was developed with the intent of defining the structure of documents like headings, paragraphs, lists, and so forth to facilitate the sharing of scientific information between researchers. Now, HTML is being widely used to format web pages with the help of different tags available in HTML language.
Basic HTML Document

Either you can use Try it option available at the top right corner of the code box to check the result of this HTML code, or let's save it in an HTML file test.htm using your favorite text editor. Finally open it using a web browser like Internet Explorer or Google Chrome, or Firefox etc. It must show the following output:

The <!DOCTYPE html> Declaration
All HTML documents start with a document type declaration:<!DOCTYPE>.
The HTML documents itself begins with <html> and end </html>.
The<!DOCTYPE> declaration for HTML5 is:
HTML-Basic Tag
HTML is a markup language and use of various tag to the format the content. These tags are enclosed within angle braces <tag name>.
And any tag is written between <> (less than and greater than) ......like <html>. The' /' (Front Slash) sign here indicates the end of the tag ......like </html>.
- The <!DOCTYPE html> declaration defines that this document is an HTML5 document.
- The <html>...</html> element is the root element of an html page.
- The <head>... </head> element contains meta information about the html.
- The <title>...</title> element specifies a little for the HTML page (which is shown in the browser's title bar).
- The <body>...</body> element defines the document's body, and is a container for all the visible contents , such as headings, paragraphs, images, hyperlinks, tables, lists etc.
- The <h1>...</h1> element defines a large heading,(<h1>,<h2>,<h3>,<h4>,<h5>,<h6>).
- The<p>...</p> element defines a large paragraph.
- The <br>...</br> element produces a line break in text.
- The <A href = "*.html>...</A> tag is used to hyperlink.
- The <img src ="picture.jpg"> tag is used to use picture and image of the document.
- The <ol>...</ol> element used to create an order list(1,2,3,4,5).
- The <ul>...</ul> element used to create unorder list(3,2,1,4,5).
- The <li>...</li> element is used to represent an item in a list.
- The <font>...</font> tag is used to change the color, size, style of a text.
- The<center> tag is used to put any content in the center of the page.
- The <hr> tag creates a line from the current position in the document to the right margin and breaks line in the accordingly.
Example:-


An HTML element is defined by a starting tag, if the element contains other content ,it ends with a closing tag.
The HTML element is everything from the start tag to the end tag:

It is very much allowed to keep one HTML element inside another HTML element.

This will display following the result

- An HTML file is text file ,so to create an HTML file we can use any text editors.
- Text editors are the programs which allow editing in a written text ,hence to create a web page we need to write our code some editor.
- Learning HTML we recommend a simple text editor like Notepad(pc),Sublime Text or TextEdit(mac).
Windows 8 or later:
Open the Start Screen (the window symbol at the bottom left on your screen). Type Notepad.
Windows 7 or earlier:
Open Start > Programs > Accessories > Notepad


Name the file "index.htm" and set the encoding to UTF-8 (which is the preferred encoding for HTML files).

Step 4: Open the HTML page in your web browser.
To run the HTML page, you need to open the file location, where you have saved the file and then either double-click on file or click on open with option
The result will look much like this:

B.HTML code with Sublime Text-editor
When you will learn the basics of HTML, then you can use some professional text editors, which will help you to write an efficient and fast code. So to use Sublime Text editors, first it needs to download and install from internet. You can easily download it this https://www.sublimetext.com/download link and can install in your PC. When installation of Sublime text editor done then you can follow the simple steps to use it:
Step 1: Open Sublime Text editor(Windows 8):

Step 2: Save the page before writing any code.
To save your page in Sublime Text press Ctrl+S or go to File option ⤏ save, to save a file use extension .htm or .html. We recommend to save the file first then write the code because after saving the page sublime text editor will give you suggestions to write code.

Step 3: Write the code in Sublime Text editor

Step 4: Open the HTML page in your Browser
To execute or open this page in Web browser just right click by mouse on sublime text page and click on Open in Browser.

C.HTML code with TextEdit(mac):
Step 1: Open TextEdit (Mac)
Open Finder > Applications > TextEdit
Also change some preferences to get the application to save files correctly. In Preferences > Format > choose "Plain Text"
Then under "Open and Save", check the box that says "Display HTML files as HTML code instead of formatted text".
Then open a new document to place the code.
Step 2: Write Some HTML
Write or copy the following HTML code into Notepad:
<!DOCTYPE html>
<html>
<body>
<h1>My First Heading</h1>
<p>My first paragraph.</p>
</body>
</html>Step 3: Save the HTML Page
Save the file on your computer. Select File > Save as in the Notepad menu.
Name the file "index.htm" and set the encoding to UTF-8 (which is the preferred encoding for HTML files).

Step 4: View the HTML Page in Your Browser
Open the saved HTML file in your favorite browser (double click on the file, or right-click - and choose "Open with").
The result will look much like this

HTML Attributes
HTML attributes provide additional information about HTML elements.
- All HTML elements can have attributes
- Attributes provide additional information about elements
- Attributes are always specified in the start tag
- Attributes usually come in name/value pairs like: name="value"
- You can add multiple attributes in one HTML element, but need to give space between two attributes.
Syntax:
The title Attribute
The title attribute defines some extra information about an element.
The value of the title attribute will be displayed as a tooltip when you mouse over the element.
In our example, we are taking this with paragraph tag and heading tag.
Example:
With <h1> tag:
With <p> tag:
Code:


The <a> tag defines a hyperlink. The href attribute provides the hyperlink, and if it is blank, then it will remain in same page.The href attribute specifies the URL of the page the link goes to:
Example:
Code:


The src Attribute
The <img> tag is used to embed an image in an HTML page. The src attribute specifies the path to the image to be displayed.This attribute can contain image in same directory or another directory. The image name or source should be correct else browser will not display the image.
Example:
Code:

Out Put:

There are two ways to specify the URL in the src attribute:
1. Absolute URL - Links to an external image that is hosted on another website. Example: src="https://www.w3schools.com/images/img_girl.jpg".
Notes: External images might be under copyright. If you do not get permission to use it, you may be in violation of copyright laws. In addition, you cannot control external images; it can suddenly be removed or changed.
2. Relative URL - Links to an image that is hosted within the website. Here, the URL does not include the domain name. If the URL begins without a slash, it will be relative to the current page. Example: src="img_girl.jpg". If the URL begins with a slash, it will be relative to the domain. Example: src="/images/img_girl.jpg".
The width and height Attributes
The <img> tag should also contain the width and height attributes, which specifies the width and height of the image (in pixels):
Example:
Code:

Out Put:

The alt Attribute
The required alt attribute for the <img> tag specifies an alternate text for an image, if the image for some reason cannot be displayed. This can be due to slow connection, or an error in the src attribute, or if the user uses a screen reader.
Example:
Code:

Out Put:

The style Attribute
The style attribute is used to add styles to an element, such as color, font, size, and more. This attribute is used for applying CSS property on any HTML element.
Example:
Code:


The lang Attribute
Code:

Out Put:

The Lowercase Attributes
Generic attributes
Here's a table of some other attributes that are readily usable with many of the HTML tags.
| Attribute | Options | Function |
|---|---|---|
| align | right, left, center | Horizontally aligns tags |
| valign | top, middle, bottom | Vertically aligns tags within an HTML element. |
| bgcolor | numeric, hexidecimal, RGB values | Places a background color behind an element |
| background | URL | Places a background image behind an element |
| id | User Defined | Names an element for use with Cascading Style Sheets. |
| class | User Defined | Classifies an element for use with Cascading Style Sheets. |
| width | Numeric Value | Specifies the width of tables, images, or table cells. |
| height | Numeric Value | Specifies the height of tables, images, or table cells. |
| title | User Defined | "Pop-up" title of the elements. |
HTML Headings
A HTML heading or HTML< h> tag can be defined as a title or a subtitle which you want to display on the webpage. When you place the text within the heading tags <h1>.........</h1>, it is displayed on the browser in the bold format and size of the text depends on the number of heading.
There are six different HTML headings which are defined with the <h1> to <h6> tags, from highest level h1 (main heading) to the least level h6 (least important heading).
h1 is the largest heading tag and h6 is the smallest one. So h1 is used for most important heading and h6 is used for least important.
Example:
Code:

Out Put:

Headings Are Important
Search engines use the headings to index the structure and content of your web pages.
Users often skim a page by its headings. It is important to use headings to show the document structure.
<h1> headings should be used for main headings, followed by <h2> headings, then the less important <h3>, and so on.
Bigger Headings
Each HTML heading has a default size. However, you can specify the size for any heading with the style attribute, using the CSS font-size property:
Example:
Code:


HTML Paragraphs
The HTML <p> element defines a paragraph.
A paragraph always starts on a new line, and browsers automatically add some white space (a margin) before and after a paragraph. Let's take a simple example to see how it work.
Example:
Code:

Out Put:

HTML Display
You cannot be sure how HTML will be displayed.
Large or small screens, and resized windows will create different results.
With HTML, you cannot change the display by adding extra spaces or extra lines in your HTML code.
The browser will automatically remove any extra spaces and lines when the page is displayed:
Example:
Code:

Out Put:

HTML Horizontal Rules
The <hr> tag defines a thematic break in an HTML page, and is most often displayed as a horizontal rule.
The <hr> element is used to separate content (or define a change) in an HTML page.
The <hr> tag is an empty tag, which means that it has no end tag.
Example:
Code:

Out Put:

HTML Line Breaks
The HTML <br> element defines a line break.
Use <br> if you want a line break (a new line) without starting a new paragraph:
Example:
Code:

Out Put:

The Poem Problem
This poem will display on a single line:
Example:
Code:

Out Put:

Solution - The HTML <pre> Element
The HTML <pre> element defines preformatted text.
The text inside a <pre> element is displayed in a fixed-width font (usually Courier), and it preserves both spaces and line breaks:
Example:
Code:


HTML Styles
style attribute is used to add styles to an element, such as color, font, size, and more.The HTML Style Attribute
Setting the style of an HTML element, can be done with the style attribute.
The HTML style attribute has the following syntax:
<tagname style="property:value;">
The property is a CSS property. The value is a CSS value.
Background Color
The CSS background-color property defines the background color for an HTML element.
Example:
Code:

Out Put:

Set background color for two different elements:

Out Put:

Text Color
The CSS color property defines the text color for an HTML element:
Example:
Code:

Out Put:

Fonts
The CSS font-family property defines the font to be used for an HTML element:
Example:
Code:

Out Put:

Text Size
The CSS font-size property defines the text size for an HTML element:
Example:
Code:

Out Put:

Text Alignment
The CSS text-align property defines the horizontal text alignment for an HTML element:
Example:
Code:

Out Put:

Chapter Summary
- Use the
styleattribute for styling HTML elements - Use
background-colorfor background color - Use
colorfor text colors - Use
font-familyfor text fonts - Use
font-sizefor text sizes - Use
text-alignfor text alignment
HTML Text Formatting
If you use a word processor, you must be familiar with the ability to make text bold, italicized, or underlined; these are just three of the ten options available to indicate how text can appear in HTML and XHTML.
HTML Formatting Elements
Formatting elements were designed to display special types of text:
<b>- This is a physical tag, which is used to Bold text the text written between it.<strong>-This is a logical tag, which tells the browser that the text is Important.<i>-This is a physical tag, which is used to make text Italic.<em>-This is a logical tag ,which is used to display content in italic.<mark>-This tag is used to highlight text.<small>-This tag is used to decrease the font size by one unit from base font size.<del>- This tag is used to Delete the content.<ins>-This tag displays the content which is added.<sub>-It displays the content below the normal line.<sup>-It displays the content above the normal line.
HTML <b> Elements
The HTML <b> element is a physical tag which display text in bold font, without any logical importance. If you write anything within <b>............</b> element, is shown in bold letters.


HTML <strong> Elements
The HTML <strong> element defines text with strong importance. The content inside is typically displayed in bold.
Example:


HTML <i> Elements
<i> element defines a part of text in an alternate voice or mood. The content inside is typically displayed in italic.
Out Put:

HTML <em> Elements
The HTML<em> element defines emphasized text. The content inside is typically displayed in italic.Example:

Out Put:

HTML <mark> Elements
<mark> element defines text that should be marked or highlighted. you should write the content within <mark>......</mark> .Example:


HTML<small> Elements
The HTML <small> element defines smaller text.
Example:

Out Put:

HTML<del> Elements
<del> element defines text that has been deleted from a document. Browsers will usually strike a line through deleted text:Example:

Out Put:

HTML<ins> Elements
The HTML <ins> element defines a text that has been inserted into a document. Browsers will usually underline inserted text:
Example:

Out Put:

HTML<sub> Elements
<sub> element defines subscript text. Subscript text appears half a character below the normal line, and is sometimes rendered in a smaller font. Subscript text can be used for chemical formulas, like H2O.Example:

Out Put:

HTML<sup> Elements
The HTML <sup> element defines superscript text. Superscript text appears half a character above the normal line, and is sometimes rendered in a smaller font. Superscript text can be used for footnotes, like WWW[1].


HTML Comments
Comment is a piece of code which is ignored by any web browser. It is a good practice to add comments into your HTML code, especially in complex documents, to indicate sections of a document, and any other notes to anyone looking at the code. Comments help you and others understand your code and increases code readability.
HTML comments are placed in between <!-- ... --> tags. So, any content placed with-in <!-- ... --> tags will be treated as comment and will be completely ignored by the browser.
HTML Comment Tags
<!-- Write your comments here -->

Out Put:

Comments are also great for debugging HTML, because you can comment out HTML lines of code, one at a


HTML Colors
Color Names

Background Color
You can set the background color for HTML elements:
Example:

Out Put:

Text Color
You can set the color of text:
Example:
Out Put:

Border Color
You can set the color of borders:
Example:

Out Put:

A hexadecimal value can be taken from any graphics software like Adobe Photoshop, Paintshop Pro or MS Paint.
Each hexadecimal code will be preceded by a pound or hash sign #. Following is a list of few colors using hexadecimal notation.

HTML Colors - RGB Values
This color value is specified using the rgb( ) property. This property takes three values, one each for red, green, and blue. The value can be an integer between 0 and 255 or a percentage.

HTML HSL and HSLA Colors
HSL stands for hue, saturation, and lightness.
HSLA color values are an extension of HSL with an Alpha channel (opacity).
HSL Color Values
In HTML, a color can be specified using hue, saturation, and lightness (HSL) in the form:
hsl(hue, saturation, lightness)
Hue is a degree on the color wheel from 0 to 360. 0 is red, 120 is green, and 240 is blue.
Saturation is a percentage value, 0% means a shade of gray, and 100% is the full color.
Lightness is also a percentage value, 0% is black, and 100% is white.
Experiment by mixing the HSL values below:HUE
SATURATION
LIGHTNESS
Saturation
Saturation can be described as the intensity of a color.
100% is pure color, no shades of gray
50% is 50% gray, but you can still see the color.
0% is completely gray, you can no longer see the color.
Example:


Lightness
The lightness of a color can be described as how much light you want to give the color, where 0% means no light (black), 50% means 50% light (neither dark nor light) 100% means full lightness (white).
Example:
Out Put:

Shades of Gray
Shades of gray are often defined by setting the hue and saturation to 0, and adjust the lightness from 0% to 100% to get darker/lighter shades:
Example:
Out Put:

HSLA Color Values
HSLA color values are an extension of HSL color values with an Alpha channel - which specifies the opacity for a color.
An HSLA color value is specified with:
hsla(hue, saturation, lightness, alpha)
The alpha parameter is a number between 0.0 (fully transparent) and 1.0 (not transparent at all):
Experiment by mixing the HSLA values below:
HUE
SATURATION
LIGHTNESS
ALPHA


HTML Images
HTML img tag is used to display image on the web page. HTML img tag is an empty tag that contains attributes only, closing tags are not used in HTML image element.
Let's see an example of HTML image.


The src Attribute
The required src attribute specifies the path (URL) to the image.It instructs the browser where to look for the image on the server.
The location of image may be on the same directory or another server.
Example:


The alt Attribute
alt attribute should describe the image:
Out Put:

If a browser cannot find an image, it will display the value of the
alt attribute:
Out Put:

Image Size - Width and Height
You have learnt about how to insert an image in your web page, now if we want to give some height

Width and Height, or Style?
The width, height, and style attributes are all valid in HTML.
However, we suggest using the style attribute. It prevents styles sheets from changing the size of images:
Example:


Images in Another Folder
If you have your images in a sub-folder, you must include the folder name in the src attribute:

Out Put:

Images on Another Server/Website
Some web sites point to an image on another server.
To point to an image on another server, you must specify an absolute (full) URL in the src attribute
Animated Images
HTML allows animated GIFs:
Example:

Out Put:

Image as a Link
To use an image as a link, put the <img> tag inside the <a> tag:

Out Put:

Image Floating
Use the CSS float property to let the image float to the right or to the left of a text:


Common Image Formats
Here are the most common image file types, which are supported in all browsers (Chrome, Edge, Firefox, Safari, Opera):
| Abbreviation | File Format | File Extension |
|---|---|---|
| APNG | Animated Portable Network Graphics | .apng |
| GIF | Graphics Interchange Format | .gif |
| ICO | Microsoft Icon | .ico, .cur |
| JPEG | Joint Photographic Expert Group image | .jpg, .jpeg, .jfif, .pjpeg, .pjp |
| PNG | Portable Network Graphics | .png |
| SVG | Scalable Vector Graphics | .svg |
Chapter Summary
- Use the HTML
<img>element to define an image - Use the HTML
srcattribute to define the URL of the image - Use the HTML
altattribute to define an alternate text for an image, if it cannot be displayed - Use the HTML
widthandheightattributes or the CSSwidthandheightproperties to define the size of the image - Use the CSS
floatproperty to let the image float to the left or to the right
HTML Background Images
Background Image on a HTML element
To add a background image on an HTML element, use the HTML style attribute and the CSS background-image property:


Background Image on a Page
If you want the entire page to have a background image, you must specify the background image on the <body> element:


Background Repeat
If the background image is smaller than the element, the image will repeat itself, horizontally and vertically, until it reaches the end of the element:

Out put:

background-repeat property to no-repeat.Example:

Out Put:

Background Cover
If you want the background image to cover the entire element, you can set the background-size property to cover.
Also, to make sure the entire element is always covered, set the background-attachment property to fixed:
This way, the background image will cover the entire element, with no stretching (the image will keep its original proportions):
Example:

Background Stretch
If you want the background image to stretch to fit the entire element, you can set the background-size property to 100% 100%:


HTML <picture> Element
The HTML<picture> element allows you to display different pictures for different devices or screen sizes. The HTML <picture> element gives web developers more flexibility in specifying image resources.The <picture> element contains one or more <source> elements, each referring to different images through the srcset attribute. This way the browser can choose the image that best fits the current view and/or device.
Each <source> element has a media attribute that defines when the image is the most suitable.


HTML Tables
HTML table tag is used to display data in tabular form (row * column). There can be many columns in a row.
We can create a table to display data in tabular form, using <table> element, with the help of <tr> , <td>, and <th> elements.
In Each table, table row is defined by <tr> tag, table header is defined by <th>, and table data is defined by <td> tags.
HTML tables are used to manage the layout of the page e.g. header section, navigation bar, body content, footer section etc. But it is recommended to use div tag over table to manage the layout of the page .

Out Put:

HTML Table - Add a Border
To add a border to a table, use the CSS border property:


HTML Table - Collapsed Borders
To let the borders collapse into one border, add the CSS border-collapse property:
Example:


HTML Table - Add Cell Padding
Cell padding specifies the space between the cell content and its borders.
If you do not specify a padding, the table cells will be displayed without padding.
To set the padding, use the CSS padding property:


HTML Table - Left-align Headings
To left-align the table headings, use the CSS text-align property.
Example:


Table - Add Border Spacing
border-spacing property.

HTML Table -With Colspan
If you want to make a cell span more than one column, you can use the colspan attribute.It will divide one cell/row into multiple columns, and the number of columns depend on the value of colspan attribute.
Example:

Out Put:

HTML Table- With Rowspan
If you want to make a cell span more than one row, you can use the rowspan attribute.
It will divide a cell into multiple rows. The number of divided rows will depend on rowspan values.

Out Put:

HTML Table - Add a Caption

Out Put:

Add more Styles
id attribute to the table

Chapter Summary
- Use the HTML
<table>element to define a table. - Use the HTML
<tr>element to define a table row. - Use the HTML
<td>element to define a table data.. - Use the HTML
<th>element to define a table heading. - Use the HTML
<caption>element to define a table caption. - Use the CSS
borderproperty to define a border. - Use the CSS
border-collapseproperty to collapse cell borders. - Use the CSS
paddingproperty to add padding to cells. - Use the CSS
text-alignproperty to align cell text. - Use the CSS
border-spacingproperty to set the spacing between cells. - Use the
colspanattribute to make a cell span many columns. - Use the
rowspanattribute to make a cell span many rows. - Use the
idattribute to uniquely define one table.
HTML Lists are used to specify lists of information. All lists may contain one or more list elements. There are three different types of HTML lists:
- Ordered List or Numbered List (ol)
- Unordered List or Bulleted List (ul)
- Description List or Definition List (dl)


Out Put:

HTML also supports description lists.
A description list is a list of terms, with a description of each term.
The HTML definition list contains following three tags:
- <dl> tag defines the start of the list.
- <dt> tag defines a term.
- <dd> tag defines the term definition (description).


HTML List Tags
| Tag | Description |
|---|---|
| <ul> | Defines an unordered list |
| <ol> | Defines an ordered list |
| <li> | Defines a list item |
| <dl> | Defines a description list |
| <dt> | Defines a term in a description list |
| <dd> | Describes the term in a description list |
HTML Ordered Lists
| Type | Description |
|---|---|
| type="1" | The list items will be numbered with numbers (default) |
| type="A" | The list items will be numbered with uppercase letters |
| type="a" | The list items will be numbered with lowercase letters |
| type="I" | The list items will be numbered with uppercase roman numbers |
| type="i" | The list items will be numbered with lowercase roman numbers |

Out Put:

Uppercase Letters(type="A"):

Out Put:

Let's see the example to display list in alphabet lowercase.


Example:

Out Put:


Out Put:

The start attribute is used with ol tag to specify from where to start the list items.
<ol type="1" start="3"> : It will show numeric values starting with "3".
<ol type="A" start="3"> : It will show capital alphabets starting with "C".
<ol type="a" start="3"> : It will show lower case alphabets starting with "c".
<ol type="I" start="3"> : It will show Roman upper case value starting with "III".
<ol type="i" start="3"> : It will show Roman lower case value starting with "iii".


Example:

Out Put:

Nested HTML Lists
Lists can be nested (list inside list):
Example:

Out Put:

Chapter Summary
- Use the HTML
<ol>element to define an ordered list - Use the HTML
typeattribute to define the numbering type - Use the HTML
<li>element to define a list item - Lists can be nested
- List items can contain other HTML elements
HTML Unordered Lists
| Type | Description |
|---|---|
| Type "disc" | This is the default style. In this style, the list items are marked with bullets. |
| Type "circle" | In this style, the list items are marked with circles. |
| Type "square" | In this style, the list items are marked with squares. |
| Type "none" | In this style, the list items are not marked . |


Circle-Example:


Out Put:


Nested HTML Lists
Lists can be nested (list inside list):
Example:

Out put:

Chapter Summary
- Use the HTML
<ol>element to define an ordered list - Use the HTML
typeattribute to define the numbering type - Use the HTML
<li>element to define a list item - Lists can be nested
- List items can contain other HTML elements
HTML Description Lists
HTML Description List or Definition List displays elements in definition form like in dictionary. The <dl>, <dt> and <dd> tags are used to define description list.
The 3 HTML description list tags are given below:
- <dl> tag defines the description list.
- <dt> tag defines data term.
- <dd> tag defines data definition (description).


Chapter Summary
- Use the HTML
<dl>element to define a description list - Use the HTML
<dt>element to define the description term - Use the HTML
<dd>element to describe the term in a description list
HTML Styles - CSS
- Inline - by using the
styleattribute inside HTML elements - Internal - by using a
<style>element in the<head>section - External - by using a
<link>element to link to an external CSS file, The most common way to add CSS, is to keep the styles in external CSS files.
Inline CSS
An inline CSS is used to apply a unique style to a single HTML element.
An inline CSS uses the style attribute of an HTML element. We can use as many properties as we want, but each property should be separated by a semicolon (;).
Example:

Out Put:

Internal CSS
An internal CSS is used to define a style for a single HTML page.
An internal CSS is defined in the <head> section of an HTML page, within a <style> element. To use Internal CSS, we can use class and id attributes.

Out Put:

External CSS
An external style sheet is used to define the style for many HTML pages.
To use an external style sheet, add a link to it in the <head> section of each HTML page.
Example:

Out Put:

The external style sheet can be written in any text editor. The file must not contain any HTML code, and must be saved with a .css extension.
Here is what the "styles.css" file looks like:

CSS Colors, Fonts and Sizes
| color | color: green; | It defines the color of text of an element |
| font-family | font-family: cursive; | Font-family defines a font for a particular element. |
| Font-size | font-size: 50px; | Font-size defines a font size for a particular element. |

Out Put:

CSS Border
The CSS border property defines a border around an HTML element.
Example:

Out Put:

CSS Padding
The CSS padding property defines a padding (space) between the text and the border.


CSS Margin
The CSS margin property defines a margin (space) outside the border.
Example:

Out Put:

Link to External CSS
External style sheets can be referenced with a full URL or with a path relative to the current web page.
Example:

Out Put:

This example links to a style sheet located in the html folder on the current web site:
Example:

Out Put:

This example links to a style sheet located in the same folder on the current web site:
Example:

Out Put:

Chapter Summary
- Use the HTML
styleattribute for inline styling - Use the HTML
<style>element to define internal CSS - Use the HTML
<link>element to refer to an external CSS file - Use the HTML
<head>element to store <style> and <link> elements - Use the CSS
colorproperty for text colors - Use the CSS
font-familyproperty for text fonts - Use the CSS
font-sizeproperty for text sizes - Use the CSS
borderproperty for borders - Use the CSS
paddingproperty for space inside the border - Use the CSS
marginproperty for space outside the border
HTML Block and Inline Elements
Block elements appear on the screen as if they have a line break before and after them. For example, the <p>, <h1>, <h2>, <h3>, <h4>, <h5>, <h6>, <ul>, <ol>, <dl>, <pre>, <hr />, <blockquote>, and <address> elements are all block level elements. They all start on their own new line, and anything that follows them appears on its own new line.


Inline Elements
This is a <span> element inside a paragraph.


Grouping HTML Elements
There are two important tags which we use very frequently to group various other HTML tags (i) <div> tag and (ii) <span> tag
The <div> Element
The <div> element is often used as a container for other HTML elements .Even now <div> tag can be used to create webpage layout where we define different parts (Left, Right, Top etc.)
The <div> element has no required attributes but style, class and id are common.
When used together with CSS, the <div> element can be used to style blocks of content:


The <span> Element
The <span> element is an inline container used to mark up a part of a text, or a part of a document.
The <span> element has no required attributes, but style, class and id are common.
When used together with CSS, the <span> element can be used to style parts of the text:


Chapter Summary
- There are two display values: block and inline
- A block-level element always starts on a new line and takes up the full width available
- An inline element does not start on a new line and it only takes up as much width as necessary
- The
<div>element is a block-level and is often used as a container for other HTML elements - The
<span>element is an inline container used to mark up a part of a text, or a part of a document
HTML class Attribute
The Syntax For Class

Out Put:

In the following example we have three
<div> elements with a class attribute with the value of "city". All of the three <div> elements will be styled equally according to the .city style definition in the head section:

In the following example we have two
<span> elements with a class attribute with the value of "note". Both <span> elements will be styled equally according to the .note style definition in the head section:
Out Put:

Multiple Classes
<h2> element belongs to both the city class and also to the main class, and will get the CSS styles from both of the classes: 

Different Elements Can Share Same Class
Different HTML elements can point to the same class name.
Example:

Out Put:

Use of The class Attribute in JavaScript
The class name can also be used by JavaScript to perform certain tasks for specific elements.
JavaScript can access elements with a specific class name with the getElementsByClassName() method:


Chapter Summary
- The HTML
classattribute specifies one or more class names for an element - Classes are used by CSS and JavaScript to select and access specific elements
- The
classattribute can be used on any HTML element - The class name is case sensitive
- Different HTML elements can point to the same class name
- JavaScript can access elements with a specific class name with the
getElementsByClassName()method
HTML id Attribute


Note: The id name must contain at least one character, cannot start with a number, and must not contain whitespaces (spaces, tabs, etc.).
Difference Between Class and ID
A class name can be used by multiple HTML elements, while an id name must only be used by one HTML element within the page:
Example:

Out Put:

Using The id Attribute in JavaScript
The id attribute can also be used by JavaScript to perform some tasks for that specific element.
JavaScript can access an element with a specific id with the getElementById() method:
Example:

Out Put:

Chapter Summary
- The
idattribute is used to specify a unique id for an HTML element - The value of the
idattribute must be unique within the HTML document - The
idattribute is used by CSS and JavaScript to style/select a specific element - JavaScript can access an element with a specific id with the
getElementById()method
HTML Iframes
HTML Iframe is used to display a nested webpage (a webpage within a webpage). The HTML <iframe> tag defines an inline frame, hence it is also called as an Inline frame.
An HTML iframe embeds another document within the current HTML document in the rectangular region.
HTML Iframe Syntax
The HTML <iframe> tag specifies an inline frame.
Syntax:
<iframe src="url" title="description"></iframe>
Use the height and width attributes to specify the size of the iframe.
The height and width are specified in pixels by default:


style attribute and use the CSS height and width properties:
Out Put:

Iframe - Remove the Border
By default, an iframe has a border around it.
To remove the border, add the style attribute and use the CSS border property:


With CSS, you can also change the size, style and color of the iframe's border:


Iframe - Target for a Link
An iframe can be used as the target frame for a link.
The target attribute of the link must refer to the name attribute of the iframe:
Example:

Out Put:


Out Put:

Chapter Summary
- The HTML
<iframe>tag specifies an inline frame - The
srcattribute defines the URL of the page to embed - Always include a
titleattribute (for screen readers) - The
heightandwidthattributes specifies the size of the iframe - Use
border:none;to remove the border around the iframe


The HTML <script> Tag
The HTML <script> tag is used to define a client-side script (JavaScript).
The <script> element either contains script statements, or it points to an external script file through the src attribute. Common uses for JavaScript are image manipulation, form validation, and dynamic changes of content. To select an HTML element, JavaScript most often uses the document.getElementById() method. This JavaScript example writes "Hello JavaScript!" into an HTML element with id="demo":

Out Put:

You can write your script code directly into your HTML document. Usually we keep script code in header of the document using <script> tag, otherwise there is no restriction and you can put your source code anywhere in the document but inside <script> tag.


A Taste of JavaScript
Here are some examples of what JavaScript can do:
Example
JavaScript can change content:
 Out Put:

Example
JavaScript can change styles:


Example
JavaScript can change attributes:


The HTML <noscript> Tag
The HTML <noscript> tag defines an alternate content to be displayed to users that have disabled scripts in their browser or have a browser that doesn't support scripts:

Out Put:

Default Scripting Language
There may be a situation when you will include multiple script files and ultimately using multiple <script> tags. You can specify a default scripting language for all your script tags. This saves you from specifying the language every time you use a script tag within the page. Below is the example −
<meta http-equiv = "Content-Script-Type" content = "text/JavaScript" />Note that you can still override the default by specifying a language within the script tag.
HTML File Paths
A file path describes the location of a file in a web site's folder structure.
File paths are like an address of file for a web browser. We can link any external resource to add in our HTML file with the help of file paths such as images, file, CSS file, JS file, video, etc.
The src or href attribute requires an attribute to link any external source to HTML file.
Following are the different types to specify file paths:
| Path | Description |
|---|---|
| <img src="picture.jpg"> | The "picture.jpg" file is located in the same folder as the current page |
| <img src="images/picture.jpg"> | The "picture.jpg" file is located in the images folder in the current folder |
| <img src="/images/picture.jpg"> | The "picture.jpg" file is located in the images folder at the root of the current web |
| <img src="../picture.jpg"> | The "picture.jpg" file is located in the folder one level up from the current folder |
HTML File Paths
- Web pages
- Images
- Style sheets
- JavaScripts
There are two types of file paths:
1.Absolute File Paths
A relative file path points to a file relative to the current page.
In the following example, the file path points to a file in the images folder located at the root of the current web:
In the following example, the file path points to a file in the images folder located in the current folder:
Example:
A responsive web page should look good on large desktop screens and on small mobile phones
In addition to resize text and images, it is also common to use media queries in responsive web pages.
With media queries you can define completely different styles for different browser sizes


Out Put:

Important points for File Paths:
- Always remember to use proper URL, file name, image name, else it will not display on the webpage.
- Try to use relative file paths, so that your code will be independent of UR
HTML - The Head Element
The <head> element is a container for metadata (data about data) and is placed between the <html> tag and the <body> tag.
HTML metadata is data about the HTML document. An HTML head can contain lots of metadata information or can have very less or no information, it depends on our requirement. But head part has a crucial role an HTML document while creating a website. Metadata is not displayed. Metadata typically define the document title, character set, styles, scripts, and other meta information.
The HTML <head> element is a container for the following elements:
- <title>
- <style>
- <meta>
- <link>
- <script>
- <base>
The HTML <title> Element
The <title> element defines the title of the document. The title must be text-only, and it is shown in the browser's title bar or in the page's tab.
The <title> element is required in HTML documents!
The contents of a page title is very important for search engine optimization (SEO)
What does <title> element do?
- defines a title in the browser toolbar
- provides a title for the page when it is added to favorites
- displays a title for the page in search engine-results
Example:

Out Put:

The HTML <style> Element
<style> element is used to style the HTML page. The <style> element can have CSS properties for that HTML page only. If we want to apply CSS for multiple pages then we should use separate CSS file.

The HTML <link> Element
The <link> element defines the relationship between the current document and an external resource.
The <link> tag is most often used to link to external style sheets:
Example:


The HTML <meta> Element
The <meta> element is typically used to specify the character set, page description, keywords, author of the document, and viewport settings.
The metadata will not be displayed on the page, but are used by browsers (how to display content or reload page), by search engines (keywords), and other web services.
Example:
To define a character set:
The charset attribute specifies the character encoding. In this example we have set it to "UTF-8" which means it can handle to display any language.
To define a description of your webpage:
If you give a meta description then it will be useful for the relevant search to perform by search engines.
To define keywords for search engines:
The keyword value is also used to provide keywords for a search engine, but it may ignore by browser due to spammers.
To define author of the webpage:
The author value specifies the name of the person who wrote the page content, and it is useful to automatically extract author information by some content management systems.
To refresh document every 30 seconds:
Meta refresh is used to provide instructions to the browser to automatically refresh the page after the given time interval. As in above example it will automatically refresh after 30 sec.
Example of <meta> tags:


Setting The Viewport
The viewport is the user's visible area of a web page. It varies with the device - it will be smaller on a mobile phone than on a computer screen.
You should include the following <meta> element in all your web pages:
Syntax for <meta> viewport element:
This gives the browser instructions on how to control the page's dimensions and scaling.
The width=device-width part sets the width of the page to follow the screen-width of the device (which will vary depending on the device).
The initial-scale=1.0 part sets the initial zoom level when the page is first loaded by the browser.
Here is an example of a web page without the viewport meta tag, and the same web page with the viewport meta tag:
The HTML <script> Element
The <script> element is used to define client-side JavaScripts.
The following JavaScript writes "Hello JavaScript!" into an HTML element with id="demo":
Example:

Out Put:

The HTML <base> Element
The <base> element specifies the base URL and/or target for all relative URLs in a page.
The <base> tag must have either an href or a target attribute present, or both.
There can only be one single <base> element in a document!
Example:

Out put:

Chapter Summary
- The
<head>element is a container for metadata (data about data) - The
<head>element is placed between the<html>tag and the<body>tag - The
<title>element is required and it defines the title of the document - The
<style>element is used to define style information for a single document - The
<link>tag is most often used to link to external style sheets - The
<meta>element is typically used to specify the character set, page description, keywords, author of the document, and viewport settings - The
<script>element is used to define client-side JavaScripts - The
<base>element specifies the base URL and/or target for all relative URLs in a page.
HTML Layout Elements and Techniques
HTML layouts provide a way to arrange web pages in well-mannered, well-structured, and in responsive form or we can say that HTML layout specifies a way in which the web pages can be arranged. Web-page layout works with arrangement of visual elements of an HTML document.
Web page layout is the most important part to keep in mind while creating a website so that our website can appear professional with the great look. You can also use CSS and JAVASCRIPT based frameworks for creating layouts for responsive and dynamic website designing.
Example:
<!DOCTYPE html>
<html lang="en">
<head>
<title>CSS Template</title>
<meta charset="utf-8">
<meta name="viewport" content="width=device-width, initial-scale=1">
<style>
* {
box-sizing: border-box;
}
body {
font-family: Arial, Helvetica, sans-serif;
}
/* Style the header */
header {
background-color: #666;
padding: 30px;
text-align: center;
font-size: 30px;
color: white;
}
/* Create two columns/boxes that floats next to each other */
nav {
float: left;
width: 30%;
height: 300px; /* only for demonstration, should be removed */
background: #ccc;
padding: 20px;
}
/* Style the list inside the menu */
nav ul {
list-style-type: none;
padding: 0;
}
article {
float: left;
padding: 20px;
width: 70%;
background-color: #f1f1f1;
height: 300px; /* only for demonstration, should be removed */
}
/* Clear floats after the columns */
section::after {
content: "";
display: table;
clear: both;
}
/* Style the footer */
footer {
background-color: #777;
padding: 10px;
text-align: center;
color: white;
}
/* Responsive layout - makes the two columns/boxes stack on top of each other instead of next to each other, on small screens */
@media (max-width: 600px) {
nav, article {
width: 100%;
height: auto;
}
}
</style>
</head>
<body>
<h2>CSS Layout Float</h2>
<p>In this example, we have created a header, two columns/boxes and a footer. On smaller screens, the columns will stack on top of each other.</p>
<header>
<h2>Language</h2>
</header>
<section>
<nav>
<ul>
<li><a href="#">HTML</a></li>
<li><a href="#">CSS</a></li>
<li><a href="#">JAVASCRIPT</a></li>
</ul>
</nav>
<article>
<h1>HTML</h1>
<p>HTML stands for Hypertext Markup Language, and it is the most widely used language to write Web Pages. In 1989, Tim Berners-Lee of Switzerland that used a special type of language to create World-Wide-Web pages and named them Hypertext Markup Language(HTML)..</p>
</article>
</section>
<footer>
<p>Footer</p>
</footer>
</body>
</html>
Out Put:

HTML Layout Elements
HTML has several semantic elements that define the different parts of a web page:
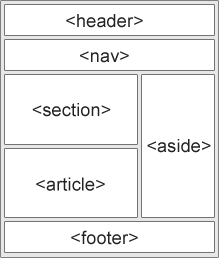
<header>- Defines a header for a document or a section<nav>- Defines a set of navigation links<section>- Defines a section in a document<article>- Defines an independent, self-contained content<aside>- Defines content aside from the content (like a sidebar)<footer>- Defines a footer for a document or a section<details>- Defines additional details that the user can open and close on demand<summary>- Defines a heading for the<details>element
Description of various Layout Elements:
HTML<header>
The <header> element is used to create header section of web pages. The header contains the introductory content, heading element, logo or icon for the webpage, and authorship information.
A <header> element typically contains:
- one or more heading elements (<h1> - <h6>)
- logo or icon
- authorship information
Example:

Out Put:

<nav> elements is a container for the main block of navigation links. It can contain links for the same page or for other pages.
Out Put:

HTML<section>
HTML <section>elements represent a separate section of a web page which contains related element grouped together. It can contain: text, images, tables, videos, etc.
Examples of where a <section> element can be used:
- Chapters
- Introduction
- News items
- Contact information
Example:

Out Put:

HTML <article>
tag is used to contain a self-contained article such as big story, huge article, etc.
Examples of where the <article> element can be used:
- Forum posts
- Blog posts
- User comments
- Product cards
- Newspaper articles
Example:

Out Put:

HTML<aside>
HTML<aside> define aside content related to primary content. The <aside> content must be related to the primary content. It can function as side bar for the main content of web page.
Example:

Out Put:

HTML<footer>element defines the footer for that document or web page. It mostly contains information about author, copyright, other links, etc.
A <footer> element typically contains:
- authorship information
- copyright information
- contact information
- sitemap
- back to top links
- related documents
Example:

Out Put:

HTML <details>
HTML <details> element is used to add extra details about the web page and use can hide or show the details as per requirement.
Example:

Out Put:

HTML<summary>
HTML <summary> element is used with the <details> element in a web page. It is used as summary, captions about the content of <details>element.
Example:

Out Put:

HTML Layout Techniques
There are four different techniques to create multicolumn layouts. Each technique has its pros and cons:
- CSS framework
- CSS float property
- CSS flexbox
- CSS grid
CSS Frameworks
If you want to create your layout fast, you can use a CSS framework
CSS Float Layout
It is common to do entire web layouts using the CSS float property. Float is easy to learn - you just need to remember how the float and clear properties work.
CSS Flexbox Layout
Use of flexbox ensures that elements behave predictably when the page layout must accommodate different screen sizes and different display devices.
CSS Grid Layout
The CSS Grid Layout Module offers a grid-based layout system, with rows and columns, making it easier to design web pages without having to use floats and positioning.
HTML Responsive Web Design
Responsive Web Design is about using HTML and CSS to automatically resize, hide, shrink, or enlarge, a
website, to make it look good on all devices (desktops, tablets, and phones):
Setting The Viewport
To create a responsive website, add the following <meta> tag to all your web pages:


This will set the viewport of your page, which will give the browser instructions on how to control the page's dimensions and scaling.
Responsive Images
Responsive images are images that scale nicely to fit any browser size.
Using the width Property
If the CSS width property is set to 100%, the image will be responsive and scale up and down:
Example:

Out Put:

Notice that in the example above, the image can be scaled up to be larger than its original size. A better solution, in many cases, will be to use the max-width property instead.
Using the max-width Property
If the max-width property is set to 100%, the image will scale down if it has to, but never scale up to be larger than its original size:
Example:

Out Put:

Show Different Images Depending on Browser Width
The HTML <picture> element allows you to define different images for different browser window sizes.
Resize the browser window to see how the image below change depending on the width:
Example:

Out Put:

Responsive Text Size
The text size can be set with a "vw" unit, which means the "viewport width". That way the text size will follow the size of the browser window:
Example:

Out Put:

Viewport is the browser window size. 1vw = 1% of viewport width. If the viewport is 50cm wide, 1vw is 0.5cm.
Media Queries
In addition to resize text and images, it is also common to use media queries in responsive web pages. With media queries you can define completely different styles for different browser sizes.
Example:


Responsive Web Page - Full Example
A responsive web page should look good on large desktop screens and on small mobile phones.
Example:
<!DOCTYPE html>
<html>
<head>
<meta name="viewport" content="width=device-width, initial-scale=1.0">
<style>
* {
box-sizing: border-box;
}
.menu {
float: left;
width: 20%;
text-align: center;
}
.menu a {
background-color: #e5e5e5;
padding: 8px;
margin-top: 7px;
display: block;
width: 100%;
color: black;
}
.main {
float: left;
width: 60%;
padding: 0 20px;
}
.right {
background-color: #e5e5e5;
float: left;
width: 20%;
padding: 15px;
margin-top: 7px;
text-align: center;
}
@media only screen and (max-width: 620px) {
/* For mobile phones: */
.menu, .main, .right {
width: 100%;
}
}
</style>
</head>
<body style="font-family:Verdana;color:#aaaaaa;">
<div style="background-color:#e5e5e5;padding:15px;text-align:center;">
<h1>Hello World</h1>
</div>
<div style="overflow:auto">
<div class="menu">
<a href="#">Link 1</a><a href="#">Link 2</a><a href="#">Link 3</a><a href="#">Link 4</a>
</div>
<div class="main">
<h2>Lorum Ipsum</h2>
<p>Lorem ipsum dolor sit amet, consectetuer adipiscing elit, sed diam nonummy nibh euismod tincidunt ut laoreet dolore magna aliquam erat volutpat.</p>
</div>
<div class="right">
<h2>About</h2>
<p>Lorem ipsum dolor sit amet, consectetuer adipiscing elit.</p>
</div>
</div>
<div style="background-color:#e5e5e5;text-align:center;padding:10px;margin-top:7px;">© copyright codewithsuman.blogspot.com</div>
</body>
</html>
Out Put:

Bootstrap
Another popular CSS framework is Bootstrap. Bootstrap uses HTML, CSS and jQuery to make responsive web pages.
Example:


HTML Computer Code Elements


Following is a list of some tags which are used in HTML for this task.
- <code>
- <kbd>
- <samp>
- <var>
- <pre>
HTML <code> For Computer Code
The HTML <code> element is used to define a piece of computer code. The content inside is displayed in the browser's default monospace font.
Example:


The HTML <kbd> element is used to define keyboard input. The content inside is displayed in the browser's default monospace font.
Example:


HTML <samp> For Program Output
The HTML <samp> element is used to define sample output from a computer program. The content inside is displayed in the browser's default monospace font.
Example:

Out Put:

HTML <var> For Variables
The HTML <var> element is used to define a variable in programming or in a mathematical expression. The content inside is typically displayed in italic.
Example:

Out Put:

HTML <pre> For Computer Code
<code> element inside a <pre> element:
Out Put:

Chapter Summary
- The
<code>element defines a piece of computer code - The
<kbd>element defines keyboard input - The
<samp>element defines sample output from a computer program - The
<var>element defines a variable in programming or in a mathematical expression - The
<pre>element defines preformatted text
HTML Entities
HTML character entities are used as a replacement of reserved characters in HTML. You can also replace characters that are not present on your keyboard by entities.
These characters are replaced because some characters are reserved in HTML. HTML entities provide a wide range of characters which can allow you to add icons, geometric shapes, mathematical operators, etc. If you use the less than (<) or greater than (>) signs in your text, the browser might mix them with tags.
How to use an Entity:
You can use an entity in your HTML document by name or by a numerical character reference. Each entity starts with symbol ampersand (&) and ends with a semicolon (;).
A character entity looks like this:
&entity_name;OR
&#entity_number;To display a less than sign (<) we must write: < or <
Advantage of using an entity name: An entity name is easy to remember.
Disadvantage of using an entity name: Browsers may not support all entity names, but the support for entity numbers is good.
Non-breaking Space
A commonly used entity in HTML is the non-breaking space:
A non-breaking space is a space that will not break into a new line.
Two words separated by a non-breaking space will stick together (not break into a new line). This is handy when breaking the words might be disruptive.
Examples:
- § 10
- 10 km/h
- 10 PM
Another common use of the non-breaking space is to prevent browsers from truncating spaces in HTML pages.
Some Useful HTML Character Entities
| Result | Description | Entity Name | Entity Number |
|---|---|---|---|
| non-breaking space | | 160 | |
| < | less than | < | 60 |
| > | greater than | > | 62 |
| & | ampersand | & | 38 |
| " | double quotation mark | " | 34 |
| ' | single quotation mark (apostrophe) | ' | 39 |
| ¢ | cent | ¢ | 162 |
| £ | pound | £ | 163 |
| ¥ | yen | ¥ | 165 |
| € | Euro | € | 8364 |
| © | copyright | © | 169 |
| ® | registered trademark | ® | 174 |
Combining Diacritical Marks
A diacritical mark is a "glyph" added to a letter.
Diacritical marks can appear both above and below a letter, inside a letter, and between two letters.
Diacritical marks can be used in combination with alphanumeric characters to produce a character that is not present in the character set (encoding) used in the page.
Here are some examples:
| Mark | Character | Construct | Result |
|---|---|---|---|
| ̀ | a | à | à |
| ́ | a | á | á |
| ̂ | a | â | â |
| ̃ | a | ã | ã |
| ̀ | O | Ò | Ò |
| ́ | O | Ó | Ó |
| ̂ | O | Ô | Ô |
| ̃ | O | Õ | Õ |
HTML Symbols


Some Mathematical Symbols Supported by HTML
| Char | Number | Entity | Description |
|---|---|---|---|
| ∀ | ∀ | ∀ | FOR ALL |
| ∂ | ∂ | ∂ | PARTIAL DIFFERENTIAL |
| ∃ | ∃ | ∃ | THERE EXISTS |
| ∅ | ∅ | ∅ | EMPTY SETS |
| ∇ | ∇ | ∇ | NABLA |
| ∈ | ∈ | ∈ | ELEMENT OF |
| ∉ | ∉ | ∉ | NOT AN ELEMENT OF |
| ∋ | ∋ | ∋ | CONTAINS AS MEMBER |
| ∏ | ∏ | ∏ | N-ARY PRODUCT |
| ∑ | ∑ | ∑ | N-ARY SUMMATION |
| Char | Number | Entity | Description |
|---|---|---|---|
| Α | Α | Α | GREEK CAPITAL LETTER ALPHA |
| Β | Β | Β | GREEK CAPITAL LETTER BETA |
| Γ | Γ | Γ | GREEK CAPITAL LETTER GAMMA |
| Δ | Δ | Δ | GREEK CAPITAL LETTER DELTA |
| Ε | Ε | Ε | GREEK CAPITAL LETTER EPSILON |
| Ζ | Ζ | Ζ | GREEK CAPITAL LETTER ZETA |
Some Other Entities Supported by HTML
| Char | Number | Entity | Description |
|---|---|---|---|
| © | © | © | COPYRIGHT SIGN |
| ® | ® | ® | REGISTERED SIGN |
| € | € | € | EURO SIGN |
| ™ | ™ | ™ | TRADEMARK |
| ← | ← | ← | LEFTWARDS ARROW |
| ↑ | ↑ | ↑ | UPWARDS ARROW |
| → | → | → | RIGHTWARDS ARROW |
| ↓ | ↓ | ↓ | DOWNWARDS ARROW |
| ♠ | ♠ | ♠ | BLACK SPADE SUIT |
| ♣ | ♣ | ♣ | BLACK CLUB SUIT |
| ♥ | ♥ | ♥ | BLACK HEART SUIT |
| ♦ | ♦ | ♦ | BLACK DIAMOND SUIT |
HTML Charset (Character Sets)
From ASCII to UTF-8
ASCII was the first character encoding standard. ASCII defined 128 different characters that could be used on the internet: numbers (0-9), English letters (A-Z), and some special characters like ! $ + - ( ) @ < > .
ISO-8859-1 was the default character set for HTML 4. This character set supported 256 different character codes. HTML 4 also supported UTF-8.
ANSI (Windows-1252) was the original Windows character set. ANSI is identical to ISO-8859-1, except that ANSI has 32 extra characters.
The HTML5 specification encourages web developers to use the UTF-8 character set, which covers almost all of the characters and symbols in the world!
The HTML charset Attribute
To display an HTML page correctly, a web browser must know the character set used in the page.
This is specified in the <meta> tag:
<meta charset="UTF-8">
Differences Between Character Sets
The following table displays the differences between the character sets described above:
| Numb | ASCII | ANSI | 8859 | UTF-8 | Description |
|---|---|---|---|---|---|
| 32 | space | ||||
| 33 | ! | ! | ! | ! | exclamation mark |
| 34 | " | " | " | " | quotation mark |
| 35 | # | # | # | # | number sign |
| 36 | $ | $ | $ | $ | dollar sign |
| 37 | % | % | % | % | percent sign |
| 38 | & | & | & | & | ampersand |
| 39 | ' | ' | ' | ' | apostrophe |
| 40 | ( | ( | ( | ( | left parenthesis |
| 41 | ) | ) | ) | ) | right parenthesis |
| 42 | * | * | * | * | asterisk |
| 43 | + | + | + | + | plus sign |
| 44 | , | , | , | , | comma |
| 45 | - | - | - | - | hyphen-minus |
| 46 | . | . | . | . | full stop |
| 47 | / | / | / | / | solidus |
| 48 | 0 | 0 | 0 | 0 | digit zero |
| 49 | 1 | 1 | 1 | 1 | digit one |
| 50 | 2 | 2 | 2 | 2 | digit two |
| 51 | 3 | 3 | 3 | 3 | digit three |
| 52 | 4 | 4 | 4 | 4 | digit four |
| 53 | 5 | 5 | 5 | 5 | digit five |
| 54 | 6 | 6 | 6 | 6 | digit six |
| 55 | 7 | 7 | 7 | 7 | digit seven |
| 56 | 8 | 8 | 8 | 8 | digit eight |
| 57 | 9 | 9 | 9 | 9 | digit nine |
| 58 | : | : | : | : | colon |
| 59 | ; | ; | ; | ; | semicolon |
| 60 | < | < | < | < | less-than sign |
| 61 | = | = | = | = | equals sign |
| 62 | > | > | > | > | greater-than sign |
| 63 | ? | ? | ? | ? | question mark |
| 64 | @ | @ | @ | @ | commercial at |
| 65 | A | A | A | A | Latin capital letter A |
| 66 | B | B | B | B | Latin capital letter B |
| 67 | C | C | C | C | Latin capital letter C |
| 68 | D | D | D | D | Latin capital letter D |
| 69 | E | E | E | E | Latin capital letter E |
| 70 | F | F | F | F | Latin capital letter F |
| 71 | G | G | G | G | Latin capital letter G |
| 72 | H | H | H | H | Latin capital letter H |
| 73 | I | I | I | I | Latin capital letter I |
| 74 | J | J | J | J | Latin capital letter J |
| 75 | K | K | K | K | Latin capital letter K |
| 76 | L | L | L | L | Latin capital letter L |
| 77 | M | M | M | M | Latin capital letter M |
| 78 | N | N | N | N | Latin capital letter N |
| 79 | O | O | O | O | Latin capital letter O |
| 80 | P | P | P | P | Latin capital letter P |
| 81 | Q | Q | Q | Q | Latin capital letter Q |
| 82 | R | R | R | R | Latin capital letter R |
| 83 | S | S | S | S | Latin capital letter S |
| 84 | T | T | T | T | Latin capital letter T |
| 85 | U | U | U | U | Latin capital letter U |
| 86 | V | V | V | V | Latin capital letter V |
| 87 | W | W | W | W | Latin capital letter W |
| 88 | X | X | X | X | Latin capital letter X |
| 89 | Y | Y | Y | Y | Latin capital letter Y |
| 90 | Z | Z | Z | Z | Latin capital letter Z |
| 91 | [ | [ | [ | [ | left square bracket |
| 92 | \ | \ | \ | \ | reverse solidus |
| 93 | ] | ] | ] | ] | right square bracket |
| 94 | ^ | ^ | ^ | ^ | circumflex accent |
| 95 | _ | _ | _ | _ | low line |
| 96 | ` | ` | ` | ` | grave accent |
| 97 | a | a | a | a | Latin small letter a |
| 98 | b | b | b | b | Latin small letter b |
| 99 | c | c | c | c | Latin small letter c |
| 100 | d | d | d | d | Latin small letter d |
| 101 | e | e | e | e | Latin small letter e |
| 102 | f | f | f | f | Latin small letter f |
| 103 | g | g | g | g | Latin small letter g |
| 104 | h | h | h | h | Latin small letter h |
| 105 | i | i | i | i | Latin small letter i |
| 106 | j | j | j | j | Latin small letter j |
| 107 | k | k | k | k | Latin small letter k |
| 108 | l | l | l | l | Latin small letter l |
| 109 | m | m | m | m | Latin small letter m |
| 110 | n | n | n | n | Latin small letter n |
| 111 | o | o | o | o | Latin small letter o |
| 112 | p | p | p | p | Latin small letter p |
| 113 | q | q | q | q | Latin small letter q |
| 114 | r | r | r | r | Latin small letter r |
| 115 | s | s | s | s | Latin small letter s |
| 116 | t | t | t | t | Latin small letter t |
| 117 | u | u | u | u | Latin small letter u |
| 118 | v | v | v | v | Latin small letter v |
| 119 | w | w | w | w | Latin small letter w |
| 120 | x | x | x | x | Latin small letter x |
| 121 | y | y | y | y | Latin small letter y |
| 122 | z | z | z | z | Latin small letter z |
| 123 | { | { | { | { | left curly bracket |
| 124 | | | | | | | | | vertical line |
| 125 | } | } | } | } | right curly bracket |
| 126 | ~ | ~ | ~ | ~ | tilde |
| 127 | DEL | ||||
| 128 | € | euro sign | |||
| 129 | | | | NOT USED | |
| 130 | ‚ | single low-9 quotation mark | |||
| 131 | ƒ | Latin small letter f with hook | |||
| 132 | „ | double low-9 quotation mark | |||
| 133 | … | horizontal ellipsis | |||
| 134 | † | dagger | |||
| 135 | ‡ | double dagger | |||
| 136 | ˆ | modifier letter circumflex accent | |||
| 137 | ‰ | per mille sign | |||
| 138 | Š | Latin capital letter S with caron | |||
| 139 | ‹ | single left-pointing angle quotation mark | |||
| 140 | Π| Latin capital ligature OE | |||
| 141 | | | | NOT USED | |
| 142 | Ž | Latin capital letter Z with caron | |||
| 143 | | | | NOT USED | |
| 144 | | | | NOT USED | |
| 145 | ‘ | left single quotation mark | |||
| 146 | ’ | right single quotation mark | |||
| 147 | “ | left double quotation mark | |||
| 148 | ” | right double quotation mark | |||
| 149 | • | bullet | |||
| 150 | – | en dash | |||
| 151 | — | em dash | |||
| 152 | ˜ | small tilde | |||
| 153 | ™ | trade mark sign | |||
| 154 | š | Latin small letter s with caron | |||
| 155 | › | single right-pointing angle quotation mark | |||
| 156 | œ | Latin small ligature oe | |||
| 157 | | | | NOT USED | |
| 158 | ž | Latin small letter z with caron | |||
| 159 | Ÿ | Latin capital letter Y with diaeresis | |||
| 160 | no-break space | ||||
| 161 | ¡ | ¡ | ¡ | inverted exclamation mark | |
| 162 | ¢ | ¢ | ¢ | cent sign | |
| 163 | £ | £ | £ | pound sign | |
| 164 | ¤ | ¤ | ¤ | currency sign | |
| 165 | ¥ | ¥ | ¥ | yen sign | |
| 166 | ¦ | ¦ | ¦ | broken bar | |
| 167 | § | § | § | section sign | |
| 168 | ¨ | ¨ | ¨ | diaeresis | |
| 169 | © | © | © | copyright sign | |
| 170 | ª | ª | ª | feminine ordinal indicator | |
| 171 | « | « | « | left-pointing double angle quotation mark | |
| 172 | ¬ | ¬ | ¬ | not sign | |
| 173 | | | | soft hyphen | |
| 174 | ® | ® | ® | registered sign | |
| 175 | ¯ | ¯ | ¯ | macron | |
| 176 | ° | ° | ° | degree sign | |
| 177 | ± | ± | ± | plus-minus sign | |
| 178 | ² | ² | ² | superscript two | |
| 179 | ³ | ³ | ³ | superscript three | |
| 180 | ´ | ´ | ´ | acute accent | |
| 181 | µ | µ | µ | micro sign | |
| 182 | ¶ | ¶ | ¶ | pilcrow sign | |
| 183 | · | · | · | middle dot | |
| 184 | ¸ | ¸ | ¸ | cedilla | |
| 185 | ¹ | ¹ | ¹ | superscript one | |
| 186 | º | º | º | masculine ordinal indicator | |
| 187 | » | » | » | right-pointing double angle quotation mark | |
| 188 | ¼ | ¼ | ¼ | vulgar fraction one quarter | |
| 189 | ½ | ½ | ½ | vulgar fraction one half | |
| 190 | ¾ | ¾ | ¾ | vulgar fraction three quarters | |
| 191 | ¿ | ¿ | ¿ | inverted question mark | |
| 192 | À | À | À | Latin capital letter A with grave | |
| 193 | Á | Á | Á | Latin capital letter A with acute | |
| 194 | Â | Â | Â | Latin capital letter A with circumflex | |
| 195 | Ã | Ã | Ã | Latin capital letter A with tilde | |
| 196 | Ä | Ä | Ä | Latin capital letter A with diaeresis | |
| 197 | Å | Å | Å | Latin capital letter A with ring above | |
| 198 | Æ | Æ | Æ | Latin capital letter AE | |
| 199 | Ç | Ç | Ç | Latin capital letter C with cedilla | |
| 200 | È | È | È | Latin capital letter E with grave | |
| 201 | É | É | É | Latin capital letter E with acute | |
| 202 | Ê | Ê | Ê | Latin capital letter E with circumflex | |
| 203 | Ë | Ë | Ë | Latin capital letter E with diaeresis | |
| 204 | Ì | Ì | Ì | Latin capital letter I with grave | |
| 205 | Í | Í | Í | Latin capital letter I with acute | |
| 206 | Î | Î | Î | Latin capital letter I with circumflex | |
| 207 | Ï | Ï | Ï | Latin capital letter I with diaeresis | |
| 208 | Ð | Ð | Ð | Latin capital letter Eth | |
| 209 | Ñ | Ñ | Ñ | Latin capital letter N with tilde | |
| 210 | Ò | Ò | Ò | Latin capital letter O with grave | |
| 211 | Ó | Ó | Ó | Latin capital letter O with acute | |
| 212 | Ô | Ô | Ô | Latin capital letter O with circumflex | |
| 213 | Õ | Õ | Õ | Latin capital letter O with tilde | |
| 214 | Ö | Ö | Ö | Latin capital letter O with diaeresis | |
| 215 | × | × | × | multiplication sign | |
| 216 | Ø | Ø | Ø | Latin capital letter O with stroke | |
| 217 | Ù | Ù | Ù | Latin capital letter U with grave | |
| 218 | Ú | Ú | Ú | Latin capital letter U with acute | |
| 219 | Û | Û | Û | Latin capital letter U with circumflex | |
| 220 | Ü | Ü | Ü | Latin capital letter U with diaeresis | |
| 221 | Ý | Ý | Ý | Latin capital letter Y with acute | |
| 222 | Þ | Þ | Þ | Latin capital letter Thorn | |
| 223 | ß | ß | ß | Latin small letter sharp s | |
| 224 | à | à | à | Latin small letter a with grave | |
| 225 | á | á | á | Latin small letter a with acute | |
| 226 | â | â | â | Latin small letter a with circumflex | |
| 227 | ã | ã | ã | Latin small letter a with tilde | |
| 228 | ä | ä | ä | Latin small letter a with diaeresis | |
| 229 | å | å | å | Latin small letter a with ring above | |
| 230 | æ | æ | æ | Latin small letter ae | |
| 231 | ç | ç | ç | Latin small letter c with cedilla | |
| 232 | è | è | è | Latin small letter e with grave | |
| 233 | é | é | é | Latin small letter e with acute | |
| 234 | ê | ê | ê | Latin small letter e with circumflex | |
| 235 | ë | ë | ë | Latin small letter e with diaeresis | |
| 236 | ì | ì | ì | Latin small letter i with grave | |
| 237 | í | í | í | Latin small letter i with acute | |
| 238 | î | î | î | Latin small letter i with circumflex | |
| 239 | ï | ï | ï | Latin small letter i with diaeresis | |
| 240 | ð | ð | ð | Latin small letter eth | |
| 241 | ñ | ñ | ñ | Latin small letter n with tilde | |
| 242 | ò | ò | ò | Latin small letter o with grave | |
| 243 | ó | ó | ó | Latin small letter o with acute | |
| 244 | ô | ô | ô | Latin small letter o with circumflex | |
| 245 | õ | õ | õ | Latin small letter o with tilde | |
| 246 | ö | ö | ö | Latin small letter o with diaeresis | |
| 247 | ÷ | ÷ | ÷ | division sign | |
| 248 | ø | ø | ø | Latin small letter o with stroke | |
| 249 | ù | ù | ù | Latin small letter u with grave | |
| 250 | ú | ú | ú | Latin small letter u with acute | |
| 251 | û | û | û | Latin small letter with circumflex | |
| 252 | ü | ü | ü | Latin small letter u with diaeresis | |
| 253 | ý | ý | ý | Latin small letter y with acute | |
| 254 | þ | þ | þ | Latin small letter thorn | |
| 255 | ÿ | ÿ | ÿ | Latin small letter y with diaeresis |
The ASCII Character Set
ASCII uses the values from 0 to 31 (and 127) for control characters.
ASCII uses the values from 32 to 126 for letters, digits, and symbols.
ASCII does not use the values from 128 to 255.
The ANSI Character Set (Windows-1252)
ANSI is identical to ASCII for the values from 0 to 127.
ANSI has a proprietary set of characters for the values from 128 to 159.
ANSI is identical to UTF-8 for the values from 160 to 255.
The ISO-8859-1 Character Set
ISO-8859-1 is identical to ASCII for the values from 0 to 127.
ISO-8859-1 does not use the values from 128 to 159.
ISO-8859-1 is identical to UTF-8 for the values from 160 to 255.
The UTF-8 Character Set
UTF-8 is identical to ASCII for the values from 0 to 127.
UTF-8 does not use the values from 128 to 159.
UTF-8 is identical to both ANSI and 8859-1 for the values from 160 to 255.
UTF-8 continues from the value 256 with more than 10 000 different characters.
Why UTF 8 is also supported in HTML4?
Because ANSI and ISO-8859-1 were so limited, HTML 4 also supported UTF-8.The default character encoding for HTML5 is UTF-8.
UTF-8 syntax for HTML4:
- <meta http-equiv="Content-Type" content="text/html;charset=ISO-8859-1">
TF-8 syntaUx for HTML5:
- <meta charset="UTF-8">
HTML URL Encode
A URL is another word for a web address.
A URL can be composed of words (e.g. codewithsuman.blogspot.com), or an Internet Protocol (IP) address (e.g. 192.68.20.50).
Most people enter the name when surfing, because names are easier to remember than numbers.
URL - Uniform Resource Locator
Web browsers request pages from web servers by using a URL.
A Uniform Resource Locator (URL) is used to address a document (or other data) on the web.
Syntax of a URL:
- scheme://prefix.domain:port/path/filename
Explanation:
- scheme - defines the type of Internet service (most common is http or https)
- prefix - defines a domain prefix (default for http is www)
- domain - defines the Internet domain name (like codewithsuman.blogspot.com)
- port - defines the port number at the host (default for http is 80)
- path - defines a path at the server (If omitted: the root directory of the site)
- filename - defines the name of a document or resource
Common URL Schemes
The table below lists some common schemes:
| Scheme | Short for | Used for |
|---|---|---|
| http | HyperText Transfer Protocol | Common web pages. Not encrypted |
| https | Secure HyperText Transfer Protocol | Secure web pages. Encrypted |
| ftp | File Transfer Protocol | Downloading or uploading files |
| file | A file on your computer |
URL Encoding
URLs can only be sent over the Internet using the ASCII character-set. If a URL contains characters outside the ASCII set, the URL has to be converted.
URL encoding converts non-ASCII characters into a format that can be transmitted over the Internet.
URL encoding replaces non-ASCII characters with a "%" followed by hexadecimal digits.
URLs cannot contain spaces. URL encoding normally replaces a space with a plus (+) sign, or %20.
Following is a list of some character sets which are encoded by browser after submitting the text.
| Character | From Windows-1252 | From UTF-8 |
|---|---|---|
| € | %80 | %E2%82%AC |
| £ | %A3 | %C2%A3 |
| © | %A9 | %C2%A9 |
| ® | %AE | %C2%AE |
| À | %C0 | %C3%80 |
| Á | %C1 | %C3%81 |
| Â | %C2 | %C3%82 |
| Ã | %C3 | %C3%83 |
| Ä | %C4 | %C3%84 |
| Å | %C5 | %C3%85 |
HTML Versus XHTML
What is XHTML?
- XHTML stands for EXtensible HyperText Markup Language
- XHTML is a stricter, more XML-based version of HTML
- XHTML is HTML defined as an XML application
- XHTML is supported by all major browsers
Why XHTML?
XML is a markup language where all documents must be marked up correctly (be "well-formed").
XHTML was developed to make HTML more extensible and flexible to work with other data formats (such as XML). In addition, browsers ignore errors in HTML pages, and try to display the website even if it has some errors in the markup. So XHTML comes with a much stricter error handling.
The Most Important Differences from HTML
- <!DOCTYPE> is mandatory
- The xmlns attribute in <html> is mandatory
- <html>, <head>, <title>, and <body> are mandatory
- Elements must always be properly nested
- Elements must always be closed
- Elements must always be in lowercase
- Attribute names must always be in lowercase
- Attribute values must always be quoted
- Attribute minimization is forbidden
XHTML - <!DOCTYPE ....> Is Mandatory
An XHTML document must have an XHTML <!DOCTYPE> declaration.
The <html>, <head>, <title>, and <body> elements must also be present, and the xmlns attribute in <html> must specify the xml namespace for the document.
XHTML Elements Must be Properly Nested
In XHTML, elements must always be properly nested within each other, like this:
Correct:
<b><i>Some text</i></b>
XHTML Elements Must Always be Closed
In XHTML, elements must always be closed, like this:
Correct:
<p>This is another paragraph</p>
<p>This is another paragraph
XHTML Empty Elements Must Always be Closed
In XHTML, empty elements must always be closed, like this:
Correct:
A horizontal rule: <hr />
An image: <img src="happy.gif" alt="Happy face" />
A horizontal rule: <hr>
An image: <img src="happy.gif" alt="Happy face">
XHTML Elements Must be in Lowercase
In XHTML, element names must always be in lowercase, like this:
Correct:
<p>This is a paragraph</p>
</body>
<BODY>
<P>This is a paragraph</P>
</BODY>
XHTML Attribute Names Must be in Lowercase
In XHTML, attribute names must always be in lowercase, like this:
Correct:
XHTML Attribute Values Must be Quoted
In XHTML, attribute values must always be quoted, like this:
Correct:
XHTML Attribute Minimization is Forbidden
In XHTML, attribute minimization is forbidden:
Correct:
<input type="text" name="lastname" disabled="disabled" />
<input type="text" name="lastname" disabled />
| Attributes | value | Description |
|---|---|---|
| accesskey | character | It is used to generate keyboard shortcuts for the current element. |
| class | classname | It is used to provide the class name for the current element. It is mainly used with the stylesheet. |
| Contenteditable | true false | It determines whether the content within an element is editable or not. |
| contextmenu | menu_id | It defines the id for the <menu> element which is used as a context menu (a menu appear on right click) for an element. |
| data-* | somevalue | It is used to store element-specific private data which can be accessed by Javascript. |
| dir | rtl ltr auto | It specifies the direction of the content inside the current element. |
| draggable | true false auto | It specifies whether the content within an element is movable or not using Drag and Drop API. |
| dropzone | copy move link | It specifies the action is taken on the dragged element when it is dropped, ¬¬ such as whether it is copied, moved or linked. |
| hidden | It is used to hide the element from view. | |
| id | id | It specifies a unique id for the element. It can be used with CSS and JavaScript. |
| lang | language_code | It specifies the primary language for the content of an element. |
| style | style | It is used to apply inline CSS to the current element. |
| spellcheck | true false | It specifies whether the content should be checked for spelling errors or not. |
| tabindex | number | It determines the tabbing order of an element. |
| title | text | It is used to provide the title, name, or some extra information about the element. |
| translate | yes no | It specifies whether the content of the element should be translated when the page is localized or not. |
HTML Event Attributes
When a browser reacts on user action, then it is called as an event. For example, when you click on the submit button, then if the browser displays an information box.
In HTML5 there are lots of event attributes available which can be activated using a programming language such as JavaScript.
Window Event Attributes
Events triggered for the window object (applies to the <body> tag):
| Attribute | Description |
|---|---|
| onafterprint | Executed the script after the document is printed. |
| onbeforeprint | Executed the script before the document is printed. |
| onbeforeunload | Executed the script before a document being unloaded. |
| onerror | Executed the script when an error occurs. |
| onhashchange | Executed the script when the anchor part in URL of the webpage is changed. |
| onload | Executed the script when the webpage is entirely loaded. |
| onmessage | Executed the script when a message event occurs. |
| onoffline | Executed the script when the network connection is disconnected, and browser started working offline. |
| ononline | Executed the script when the browser started working online |
| onpagehide | Executed the script when the current webpage is hidden such as if the user has moved away from the current webpage. |
| onpageshow | Executed the script when the current webpage is focused. |
| onpopstate | Executed the script when the window's active history is changed. |
| onresize | Executed the script when the window is resized. |
| onstorage | Executed the script when web storage is updated. |
| onunload | Executed the script when the current webpage is unloaded, or window is closed. |
Form Events
Form event occurs when the user performs some action within the form such as submitting the form, selecting input field, etc.
The form events can be used with any element, but these are mainly used with HTML form elements.
| Attribute | Description |
|---|---|
| onblur | Executed the script when form element loses the focus. |
| onchange | Executed the script when the value of the element is changed. |
| onfocus | Trigger an event when the element gets focused. |
| oninput | Executed the script when the user enters input to the element. |
| oninvalid | Executed the script when the element does not satisfy its predefined constraints. |
| onreset | Triggers the event when user reset the form element values. |
| onsearch | Triggers the event when a search field receives some input. |
| onselect | Triggers the event when the user has selected some text. |
| onsubmit | Triggers the event when a form is submitted. |
Keyboard Events
| Attribute | Description |
|---|---|
| onkeydown | Triggers the event when the user presses down a key on the keyboard. |
| onkeypress | Trigger the event when the user presses the key which displays some character. |
| onkeyup | Trigger the event when the user releases the currently pressed key. |
Mouse Events
| Attribute | Description |
|---|---|
| onclick | Trigger the event when the mouse clicks on the element. |
| ondblclick | Trigger the event when mouse double-click occurs on the element. |
| onmousedown | Trigger the event when the mouse button is pressed on the element. |
| onmousemove | Trigger the event when the mouse pointer moves over the element. |
| onmouseout | Trigger the event when the mouse moves outside the element. |
| onmouseover | Trigger the event when the mouse moves onto the element. |
| onmouseup | Trigger the event when the mouse button is released. |
| onmousewheel | Deprecated. Use the onwheel attribute. |
| onwheel | Trigger the event when the mouse wheel rolls up or down on the element |
Drag Events
| Attribute | Description |
|---|---|
| ondrag | Script to be run when an element is dragged. |
| ondragend | Script to be run at the end of a drag operation. |
| ondragenter | Script to be run when an element has been dragged to a valid drop target. |
| ondragleave | Script to be run when an elements leaves a valid drop target. |
| ondragover | Script to be run when an element is being dragged over a valid drop target. |
| ondragstart | Script to be run at the start of a drag operation. |
| ondrop | Script to be run when dragged elements being dropped. |
| onscroll | Script to be run when an element's scrollbar is being scrolled. |
Clipboard Events
| Attribute | Description |
|---|---|
| oncopy | Trigger the event when the user copies the content to the system clipboard. |
| oncut | Trigger the event when the content of an element is cut and copy to the clipboard. |
| onpaste | Trigger the event when the user pastes some content in an element. |
Media Events
Events triggered by medias like videos, images and audio (applies to all HTML elements, but is most common in media elements, like <audio>, <embed>, <img>, <object>, and <video>).
| Attribute | Description |
|---|---|
| onabort | Executed the script when media playback is aborted. |
| oncanplay | Executed the script when the media file is ready to play. |
| oncanplaythrough | Executed the script when the media file is ready to play without buffering or stopping. |
| oncuechange | Executed the script text cue of <track> element is changed. |
| ondurationchange | Executed the script when the media file duration is changed. |
| onemptied | Executed the script if media occurs some fatal error, and the file becomes unavailable. |
| onended | Executed the script when the media file occurs its end point. |
| onerror | Executed the script when some error occurred while fetching the media data. |
| onloadeddata | Executed the script when media data is loaded. |
| onloadedmetadata | Executed the script when metadata of media file is loaded. |
| onloadstart | Executed the script when loading of media file starts. |
| onpause | Executed the script when media playback is paused. |
| onplay | Executed the script when media file ready to play after being paused. |
| onplaying | Executed the script when media file is started playing. |
| onprogress | Executed the script when the browser is in the process of getting the media data. |
| onratechange | Executed the script when playback speed changed. |
| onseeked | Executed the script when seek operation is ended and seeking attribute is set to false. |
| onseeking | Executed the script when seek operation is active and seeking attribute is set to true. |
| onstalled | Executed the script when browser unexpectedly stopped fetching the data media. |
| onsuspend | Executed the script if fetching of media data is intentionally stopped. |
| ontimeupdate | Executed the script when playback position is changed, such as if a user fasts forward the track. |
| onvolumechange | Executed the script when media volume is changed (muted or unmuted). |
| onwaiting | Executed the script if playback pause to wait for loading more data. |
Misc Events
| Attribute | Description |
|---|---|
| ontoggle | Fires when the user opens or close the <details> element. |
HTML Forms


<form> element is used to create an HTML form for user input.<form> element is a container for different types of input elements, such as: text fields, checkboxes, radio buttons, submit buttons, etc. .
form elements
.
</form>
The <input> Element
The HTML <input> element is the most used form element.
An <input> element can be displayed in many ways, depending on the type attribute.
Example:
| Type | Description |
|---|---|
| <input type="text"> | Displays a single-line text input field |
| <input type="radio"> | Displays a radio button (for selecting one of many choices) |
| <input type="checkbox"> | Displays a checkbox (for selecting zero or more of many choices) |
| <input type="submit"> | Displays a submit button (for submitting the form) |
| <input type="button"> | Displays a clickable button |
Text Fields
The <input type="text"> defines a single-line input field for text input.
Example:


The <label> Element
Notice the use of the <label> element in the example above.
The <label> tag defines a label for many form elements.
The <label> element is useful for screen-reader users, because the screen-reader will read out loud the label when the user focus on the input element.
The <label> element also help users who have difficulty clicking on very small regions (such as radio buttons or checkboxes) - because when the user clicks the text within the <label> element, it toggles the radio button/checkbox.
Radio Buttons
<input type="radio"> defines a radio button.
Out Put:

Checkboxes
The <input type="checkbox"> defines a checkbox.
Example:


The Submit Button
The <input type="submit"> defines a button for submitting the form data to a form-handler.The form-handler is specified in the form's action attribute.


The Name Attribute for <input>
Notice that each input field must have a name attribute to be submitted.
If the name attribute is omitted, the value of the input field will not be sent at all.
HTML Form Attributes
<form> element.The Action Attribute
The action attribute defines the action to be performed when the form is submitted.
Usually, the form data is sent to a file on the server when the user clicks on the submit button.
Example:


Tip: If the
action attribute is omitted, the action is set to the current page.The Target Attribute
The target attribute specifies where to display the response that is received after submitting the form.
The target attribute can have one of the following values:
| Value | Description |
|---|---|
| _blank | The response is displayed in a new window or tab |
| _self | The response is displayed in the current window |
| _parent | The response is displayed in the parent frame |
| _top | The response is displayed in the full body of the window |
| framename | The response is displayed in a named iframe |


The Method Attribute
The method attribute specifies the HTTP method to be used when submitting the form data.
The form-data can be sent as URL variables (with method="get") or as HTTP post transaction (with method="post").
Example:
This example uses the GET method when submitting the form data

Out Put:

Example:
This example uses the POST method when submitting the form data


Notes on GET:
- Appends the form data to the URL, in name/value pairs
- NEVER use GET to send sensitive data! (the submitted form data is visible in the URL!)
- The length of a URL is limited (2048 characters)
- Useful for form submissions where a user wants to bookmark the result
- GET is good for non-secure data, like query strings in Google
Notes on POST:
- Appends the form data inside the body of the HTTP request (the submitted form data is not shown in the URL)
- POST has no size limitations, and can be used to send large amounts of data.
- Form submissions with POST cannot be bookmarke
The Autocomplete Attribute
The autocomplete attribute specifies whether a form should have autocomplete on or off.
Example:

Out Put:

The Novalidate Attribute

Out Put:

HTML Form Elements
The HTML <form> Elements
<form> element can contain one or more of the following form elements:<input><label><select><textarea><button><fieldset><legend><datalist><output><option><optgroup>
The <input> Element
<input> is an important element of html form. The type attribute of input element can be various types, which defines information field.

The <label> Element
The <label> element is useful for screen-reader users, because the screen-reader will read out loud the label when the user focus on the input element.
The <label> element also help users who have difficulty clicking on very small regions (such as radio buttons or checkboxes) - because when the user clicks the text within the <label> element, it toggles the radio button/checkbox.
The for attribute of the <label> tag should be equal to the id attribute of the <input> element to bind them together.
The <select> Element
The <select> element defines a drop-down list:
The <select> element has some unique attributes you can use to control it ,such as multiple to specify whether multiple option can be selected, and size to specify how many options should be shown at once. Each menu option is defined by an <option>element nested inside the <select>.
Example:

Out Put:

Visible Values:
Use the size attribute to specify the number of visible values:
Example:


The <textarea> Element
<textarea> HTML element represents a multi-line plain -text editing control, useful you want to allow users to enter a sizable amount of free form text.rows attribute specifies the visible number of lines in a text area.The cols attribute specifies the visible width of a text area.
Example:

Out Put:

Example:


The <button> Element
The <button> element defines a clickable button:
Example:


The <fieldset> and <legend> Elements
The <fieldset> element is used to group related data in a form.The <legend> element defines a caption for the <fieldset> element.
Example:


The <datalist> Element
The <datalist> element specifies a list of pre-defined options for an <input> element.
Example:

Out Put:

The <output> Element
The <output> element represents the result of a calculation.
Example:


HTML Input Types
The type attribute specifies the type of <input> element to display. So describe the different types for the HTML <input> element.
HTML Input Types
Here are the different input types you can use in HTML:
<input type="button"><input type="checkbox"><input type="color"><input type="date"><input type="datetime-local"><input type="email"><input type="file"><input type="hidden"><input type="image"><input type="month"><input type="number"><input type="password"><input type="radio"><input type="range"><input type="reset"><input type="search"><input type="submit"><input type="tel"><input type="text"><input type="time"><input type="url"><input type="week">
Input Type Button
<input type="button"> defines a button. A push button with no default behavior displaying the value of the value attribute, empty by default.
Example:


Input Type Checkbox
<input type="checkbox"> defines a checkbox. A checkbox allowing single values to be selected/deselected.
Example:


Input Type Color
The <input type="color"> is used for input fields that should contain a color. Depending on browser support, a color picker can show up in the input field.
Example:

Out Put:

Input Type Date
The <input type="date"> is used for input fields that should contain a date. Opens a date picker or numeric wheels for year, month, day when active in supporting browsers.
Example:

Out Put:

You can also use the
min and max attributes to add restrictions to dates:Example:

Out Put:

Input Type Datetime-local
The <input type="datetime-local"> specifies a date and time input field, with no time zone.
Example:

Out Put:

Input Type Email
The <input type="email"> is used for input fields that should contain an e-mail address. Some smartphones recognize the email type, and add ".com" to the keyboard to match email input. Depending on browser support, the e-mail address can be automatically validated when submitted.
Example:


Input Type File
The <input type="file"> defines a file-select field and a "Browse" button for file uploads. A control that lets the user select a file. Use the accept attribute to define the types of file that the control can select.
Example:


Input Type Hidden
The <input type="hidden"> defines a hidden input field (not visible to a user). A control that is not displayed but whose value is submitted to the server.
Example:

Out Put:

Input Type image
The <input type="image"> defines a image input field. A graphical submit button. Displays an image defined by the src attribute .The alt attribute displays if the image src is missing.
Input Type Month
The <input type="month"> allows the user to select a month and year.
Example:

Out Put:

Input Type Number
The <input type="number"> defines a numeric input field. You can also set restrictions on what numbers are accepted.
Example:

Out Put:

Input Type Password
<input type="password"> defines a password field.
A single line-text field whose values of obscured. will alter user if site is not secure.
Example:


Input Type Radio
<input type="radio"> defines a radio button. Radio buttons let a user select ONLY ONE of a limited number of choices.
Example:

Out Put:

Input Type Range
The <input type="range"> defines a control for entering a number whose exact value is not important. Displays as a range widget defaulting a to the middle value. Default range is 0 to 100. However, you can set restrictions on what numbers are accepted with the min, max, and step attributes.
Example:


Input Type Reset
<input type="reset"> defines a reset button that will reset all form values to their default values.
Example:


Input Type Search
The <input type="search"> is used for search fields.
Example:

Out Put:

Input Type Submit
<input type="submit"> defines a button for submitting form data to a form-handler. The form-handler is specified in the form's action attribute.
Example:


Input Type Tel
The <input type="tel"> is used for input fields that should contain a telephone number.
Example:


Input Type Text
<input type="text"> defines a single-line text input field. Line breaks are automatically removed from the input value.
Example:

Out Put:

Input Type Time
The <input type="time"> allows the user to select a time (no time zone).
Example:


Input Type Url
The <input type="url"> is used for input fields that should contain a URL address.
Some smartphones recognize the url type, and adds ".com" to the keyboard to match url input.
Example:

Out Put:

Input Type Week
The <input type="week"> allows the user to select a week and year and aweek number with no time zone.
Example:


HTML Graphics
HTML Canvas Graphics
<canvas>element provides HTML a bitmapped surface to work with. It is used to draw graphics on the web page. The HTML <canvas> element is used to draw graphics, on the fly, via JavaScript.Browser Support
| Element |  Chrome Chrome |  IE IE |  Firefox Firefox |  Opera Opera |  Safari Safari |
| <canvas> | Yes | Yes | Yes | Yes | Yes |
Canvas Examples

OutPut:

Add a JavaScript
After creating the rectangular canvas area, you must add a JavaScript to do the drawing.
Here are some examples:
Draw a Line

Out Put:

Draw a Circle


Draw a Text


Stroke Text


Draw Linear Gradient
The color of the gradient are determined by two or more points: the starting point and the ending point, and , in between, optional color-stop points.

Draw Circular Gradient


HTML SVG Graphics

Out Put:

SVG Rectangle
Here, we are using width and height attributes of rect tag.
Example:


SVG Rounded Rectangle


SVG Star

Out Put:

SVG Logo
Example:

Differences Between SVG and Canvas
SVG is a language for describing 2D graphics in XML.
Canvas draws 2D graphics, on the fly (with a JavaScript).
SVG is XML based, which means that every element is available within the SVG DOM. You can attach JavaScript event handlers for an element.
In SVG, each drawn shape is remembered as an object. If attributes of an SVG object are changed, the browser can automatically re-render the shape.
Canvas is rendered pixel by pixel. In canvas, once the graphic is drawn, it is forgotten by the browser. If its position should be changed, the entire scene needs to be redrawn, including any objects that might have been covered by the graphic.
Comparison of Canvas and SVG
HTML Geolocation API
Locate the User's Position
The HTML Geolocation API is used to get the geographical position of a user.
Since this can compromise privacy, the position is not available unless the user approves it.
User Privacy- geo=navigator. geolocation;
The Geolocation API uses three methods of Geolocation interface which are given following:
| Methods | Description |
|---|---|
| getCurrentPosition() | It identifies the device or the user's current location and returns a position object with data. |
| watchPosition() | Return a value whenever the device location changes. |
| clearWatch() | It cancels the previous watchPosition() call |
Using HTML Geolocation
The getCurrentPosition() method is used to return the user's position.


Example explained:
- Check if Geolocation is supported
- If supported, run the getCurrentPosition() method. If not, display a message to the user
- If the getCurrentPosition() method is successful, it returns a coordinates object to the function specified in the parameter (showPosition)
- The showPosition() function outputs the Latitude and Longitude
Handling Errors and Rejections
getCurrentPosition() method is used to handle errors. It specifies a function to run if it fails to get the user's location:- Unknown random error Occurred
- If the user has denied for sharing location
- Location information is not available
- Request for location is timed-out.


Displaying the Result in a Map
To display the result in a map, you need access to a map service, like Google Maps.


Location-specific Information
This page has demonstrated how to show a user's position on a map.
Geolocation is also very useful for location-specific information, like:
- Up-to-date local information
- Showing Points-of-interest near the user
- Turn-by-turn navigation (GPS)
The getCurrentPosition() Method - Return Data
The getCurrentPosition() method returns an object on success. The latitude, longitude and accuracy properties are always returned. The other properties are returned if available:
| Property | Returns |
|---|---|
| coords.latitude | The latitude as a decimal number (always returned) |
| coords.longitude | The longitude as a decimal number (always returned) |
| coords.accuracy | The accuracy of position (always returned) |
| coords.altitude | The altitude in meters above the mean sea level (returned if available) |
| coords.altitudeAccuracy | The altitude accuracy of position (returned if available) |
| coords.heading | The heading as degrees clockwise from North (returned if available) |
| coords.speed | The speed in meters per second (returned if available) |
| timestamp | The date/time of the response (returned if available) |
| API | Chrome | IE | Firefox | Opera | Safari |
| Geolocation | 5.0 - 49.0 (http) 50.0 (https) | 9.0 | 3.5 | 16.0 | 5.0 |
- With web storage, web applications can store data locally within the user's browser.
- Before HTML5, application data had to be stored in cookies, included in every server request. Web storage is more secure, and large amounts of data can be stored locally, without affecting website performance.
- Unlike cookies, the storage limit is far larger (at least 5MB) and information is never transferred to the server.
- Web storage is per origin (per domain and protocol). All pages, from one origin, can store and access the same data.
HTML Web Storage Objects
HTML web storage provides two objects for storing data on the client:
window.localStorage- stores data with no expiration datewindow.sessionStorage- stores data for one session (data is lost when the browser tab is closed)
The localStorage Object

Out Put:

Example explained:
- Create a localStorage name/value pair with name="lastname" and value="Agarwal"
- Retrieve the value of "lastname" and insert it into the element with id="result"
The sessionStorage Object
The sessionStorage object is equal to the localStorage object, except that it stores the data for only one session. The data is deleted when the user closes the specific browser tab.


Remove Web Storage
you need to call two methods:
- localStorage.removeItem('key'): If you want to delete the value on a particular key, then you can use the "key," and that value will be deleted.
- localStorage.clear(): If you want to delete or clear all settings with key/value pair, then you can call this method.
Browser Support
| API | Chrome | IE | Firefox | Opera | Safari |
| Web Storage | Yes | Yes | Yes | Yes | Yes |
HTML Web Workers
- Web-workers are threaded JavaScript.
- Web-workers are the kernel-level thread.
- Web-workers requires more space and CPU time.
- Web-workers enhances the speed of a website.
- Web-worker executes codes on the client side (not server-side).
- Web worker threads communicate with each other using postMessage() callback method


Note: Before working with HTML Web Workers you must have knowledge of JavaScript as the Web Worker depends on JavaScript.
Check Web Worker Support
// Yes! Web worker support!
// Some code.....
} else {
// Sorry! No Web Worker support..
}
Create a Web Worker File
function timedCount() {
i = i + 1;
postMessage(i);
setTimeout("timedCount()",500);
}
timedCount();
w = new Worker("demo_workers.js");
}
document.getElementById("result").innerHTML = event.data;
};
- All the communication of Worker thread depends on the postMessage() method and onmessage event handler.
Reuse the Web Worker
Broswer Support
| API | Chrome | IE | Firefox | Opera | Safari |
| Web Workers | Yes | Yes | Yes | Yes | Yes |
HTML Drag and Drop

| Event | Description |
|---|---|
| Drag | It fires every time when the mouse is moved while the object is being dragged. |
| Dragstart | It is a very initial stage. It fires when the user starts dragging object. |
| Dragenter | It fires when the user moves his/her mouse cursur over the target element. |
| Dragover | This event is fired when the mouse moves over an element. |
| Dragleave | This event is fired when the mouse leaves an element. |
| Drop | Drop It fires at the end of the drag operation. |
| Dragend | It fires when user releases the mouse button to complete the drag operation. |
Make an Element Draggable
What to Drag - ondragstart and setData()
the ondragstart attribute calls a function, drag(event), that specifies what data to be dragged.
The dataTransfer.setData() method sets the data type and the value of the dragged data.
Syntax:
ev.dataTransfer.setData("text", ev.target.id);
}
Where to Drop - ondragover
ondragover event specifies where the dragged data can be dropped.event.preventDefault() method for the ondragover event.ev.preventDefault();
var data = ev.dataTransfer.getData("text");
ev.target.appendChild(document.getElementById(data));
}
| Element | Chrome | IE | Firefox | Opera | Safari |
| drag and drop feature | Yes | Yes | Yes | Yes | Yes |
HTML SSE
Receive Server-Sent Event Notifications
The EventSource object is used to receive server-sent event notifications.
Example:


Check Server-Sent Events Support
First we need to check the browser support for server-sent event. So to check the browser support for Server-sent event we will check the EventSource object is true or not.

Server-Side Code Example
For the example above to work, you need a server capable of sending data updates . So, we need to create a file in ASP, PHP or any dynamic language.
Code in PHP
<?php
header('Content-Type: text/event-stream');
header('Cache-Control: no-cache');
$time = date('r');
echo "data: The server time is: {$time}\n\n";
flush();
?>Code in ASP
<%
Response.ContentType = "text/event-stream"
Response.Expires = -1
Response.Write("data: The server time is: " & now())
Response.Flush()
%>The EventSource Object
In the examples above we used the onmessage event to get messages. But other events are also available:
| Events | Description |
|---|---|
| onopen | When a connection to the server is opened |
| onmessage | When a message is received |
| onerror | When an error occurs |
| API | Chrome | IE | Firefox | Opera | Safari |
| SSE | 6.0 | Not Supported | 6.0 | 11.5 | 5.0 |
HTML Media
HTML Multimedia
Multimedia Formats
Common Video Formats
| Format | File | Description |
|---|---|---|
| MPEG | .mpg .mpeg | MPEG. Developed by the Moving Pictures Expert Group. The first popular video format on the web. Not supported anymore in HTML. |
| AVI | .avi | AVI (Audio Video Interleave). Developed by Microsoft. Commonly used in videocameras and TV hardware. Plays well on Windows computers, but not in web browsers. |
| WMV | .wmv | WMV (Windows Media Video). Developed by Microsoft. Commonly used invideo cameras and TV hardware. Plays well on Windows computers, but not inweb browsers. |
| QuickTime | .mov | QuickTime. Developed by Apple. Commonly used in video cameras and TV hardware. Plays well on Apple computers, but not in web browsers. |
| RealVideo | .rm .ram | RealVideo. Developed by Real Media to allow video streaming with low bandwidths. Does not play in web browsers. |
| Flash | .swf .flv | Flash. Developed by Macromedia. Often requires an extra component (plug-in) toplay in web browsers. |
| Ogg | .ogg | Theora Ogg. Developed by the Xiph.Org Foundation. Supported by HTML. |
| WebM | .webm | WebM. Developed by Mozilla, Opera, Adobe, and Google. Supported by HTML. |
| MPEG-4 or MP4 | .mp4 | MP4. Developed by the Moving Pictures Expert Group. Commonly used in videocameras and TV hardware. Supported by all browsers and recommended byYouTube. |
Common Audio Formats
MP3 is the best format for compressed recorded music. The term MP3 has become synonymous with digital music.
| Format | File | Description |
|---|---|---|
| MIDI | .mid .midi | MIDI (Musical Instrument Digital Interface). Main format for all electronic music devices like synthesizers and PC sound cards. MIDI files do not contain sound, but digital notes that can be played by electronics. Plays well on all computers and music hardware, but not in web browsers. |
| RealAudio | .rm .ram | RealAudio. Developed by Real Media to allow streaming of audio with low bandwidths. Does not play in web browsers. |
| WMA | .wma | WMA (Windows Media Audio). Developed by Microsoft. Plays well on Windows computers, but not in web browsers. |
| AAC | .aac | AAC (Advanced Audio Coding). Developed by Apple as the default format for iTunes. Plays well on Apple computers, but not in web browsers. |
| WAV | .wav | WAV. Developed by IBM and Microsoft. Plays well on Windows, Macintosh, and Linux operating systems. Supported by HTML. |
| Ogg | .ogg | Ogg. Developed by the Xiph.Org Foundation. Supported by HTML. |
| MP3 | .mp3 | MP3 files are actually the sound part of MPEG files. MP3 is the most popular format for music players. Combines good compression (small files) with high quality. Supported by all browsers. |
| MP4 | .mp4 | MP4 is a video format, but can also be used for audio. Supported by all browsers. |
HTML Video
The HTML <video> Element


How it Works
The controls attribute adds video controls, like play, pause, and volume.
It is a good idea to always include width and height attributes. If height and width are not set, the page might flicker while the video loads.
The <source> element allows you to specify alternative video files which the browser may choose from. The browser will use the first recognized format.
The text between the <video> and </video> tags will only be displayed in browsers that do not support the <video> element.
HTML Video - Media Types
| File Format | Media Type |
|---|---|
| MP4 | video/mp4 |
| WebM | video/webm |
| Ogg | video/ogg |
| Attribute | Description |
|---|---|
| controls | It defines the video controls which is displayed with play/pause buttons. |
| height | It is used to set the height of the video player. |
| width | It is used to set the width of the video player. |
| poster | It specifies the image which is displayed on the screen when the video is not played. |
| autoplay | It specifies that the video will start playing as soon as it is ready. |
| loop | It specifies that the video file will start over again, every time when it is completed. |
| muted | It is used to mute the video output. |
| preload | It specifies the author view to upload video file when the page loads. |
| src | It specifies the source URL of the video file. |
HTML Video - Methods, Properties, and Events
The HTML DOM defines methods, properties, and events for the <video> element.
This allows you to load, play, and pause videos, as well as setting duration and volume.
There are also DOM events that can notify you when a video begins to play, is paused, etc.
| Element | Chrome | IE | Firefox | Opera | Safari |
| <video> | Yes | Yes | Yes | Yes | Yes |
HTML Audio
The HTML <audio> Element


HTML Audio - How It Works
The controls attribute adds audio controls, like play, pause, and volume.
The <source> element allows you to specify alternative audio files which the browser may choose from. The browser will use the first recognized format.
The text between the <audio> and </audio> tags will only be displayed in browsers that do not support the <audio> element.
Attributes of HTML Audio tag
| Attribute | Description |
|---|---|
| controls | It defines the audio controls which is displayed with play/pause buttons. |
| autoplay | It specifies that the audio will start playing as soon as it is ready. |
| loop | It specifies that the audio file will start over again, every time when it is completed. |
| muted | It is used to mute the audio output. |
| preload | It specifies the author view to upload audio file when the page loads. |
| src | It specifies the source URL of the audio file. |
HTML Audio - Media Types
| File Format | Media Type |
|---|---|
| MP3 | audio/mpeg |
| OGG | audio/ogg |
| WAV | audio/wav |
HTML Audio - Methods, Properties, and Events
The HTML DOM defines methods, properties, and events for the <audio> element.
This allows you to load, play, and pause audios, as well as set duration and volume.
There are also DOM events that can notify you when an audio begins to play, is paused, etc.
| Element | Chrome | IE | Firefox | Opera | Safari |
| <audio> | Yes | Yes | Yes | Yes | Yes |
HTML YouTube Videos
The easiest way to play videos in HTML, is to use YouTube. And,Copy the video id of the video use- iframe, object, or 'embed'.
Video Formats
YouTube will display an id when you save (or play) a video.
You can use this id, and refer to your video in the HTML code.
Playing a YouTube Video in HTML
To play your video on a web page, do the following:
- Upload the video to YouTube
- Take a note of the video id
- Define an
<iframe>element in your web page - Let the
srcattribute point to the video URL - Use the
widthandheightattributes to specify the dimension of the player - Add any other parameters to the URL (see below)

YouTube Autoplay + Mute
You can let your video start playing automatically when a user visits the page, by adding autoplay=1 to the YouTube URL.
Add mute=1 after autoplay=1 to let your video start playing automatically (but muted)

YouTube Loop
Add loop=1 to let your video loop forever.
Value 0 (default): The video will play only once.
Value 1: The video will loop (forever).
Example:

YouTube Controls
Add controls=0 to not display controls in the video player.
Value 0: Player controls does not display.
Value 1 (default): Player controls display.
Example:

HTML Plug-ins
Plug-ins
Plug-ins were designed to be used for many different purposes:
- To run Java applets
- To run Microsoft ActiveX controls
- To display Flash movies
- To display maps
- To scan for viruses
- To verify a bank id
The <object> Element
The <object> element is supported by all browsers.
The <object> element defines an embedded object within an HTML document.

The <embed> Element
The <embed> element is supported in all major browsers.
The <embed> element also defines an embedded object within an HTML document.
Web browsers have supported the <embed> element for a long time. However, it has not been a part of the HTML specification before HTML5.
Example:
HTML Reference
HTML Element Reference-by Alphabet
HTML Tags Ordered Alphabetically
HTML Element Reference-by Category
Basic HTML
| Tag | Description |
|---|---|
| <!DOCTYPE> | Defines the document type |
| <html> | Defines an HTML document |
| <head> | Contains metadata/information for the document |
| <title> | Defines a title for the document |
| <body> | Defines the document's body |
| <h1> to <h6> | Defines HTML headings |
| <p> | Defines a paragraph |
| <br> | Inserts a single line break |
| <hr> | Defines a thematic change in the content |
| <!--...--> | Defines a comment |
Formatting
| Tag | Description |
|---|---|
| <acronym> | Not supported in HTML5. Use <abbr> instead. Defines an acronym |
| <abbr> | Defines an abbreviation or an acronym |
| <address> | Defines contact information for the author/owner of a document/article |
| <b> | Defines bold text |
| <bdi> | Isolates a part of text that might be formatted in a different direction from other text outside it |
| <bdo> | Overrides the current text direction |
| <big> | Not supported in HTML5. Use CSS instead. Defines big text |
| <blockquote> | Defines a section that is quoted from another source |
| <center> | Not supported in HTML5. Use CSS instead. Defines centered text |
| <cite> | Defines the title of a work |
| <code> | Defines a piece of computer code |
| <del> | Defines text that has been deleted from a document |
| <dfn> | Specifies a term that is going to be defined within the content |
| <em> | Defines emphasized text |
| <font> | Not supported in HTML5. Use CSS instead. Defines font, color, and size for text |
| <i> | Defines a part of text in an alternate voice or mood |
| <ins> | Defines a text that has been inserted into a document |
| <kbd> | Defines keyboard input |
| <mark> | Defines marked/highlighted text |
| <meter> | Defines a scalar measurement within a known range (a gauge) |
| <pre> | Defines preformatted text |
| <progress> | Represents the progress of a task |
| <q> | Defines a short quotation |
| <rp> | Defines what to show in browsers that do not support ruby annotations |
| <rt> | Defines an explanation/pronunciation of characters (for East Asian typography) |
| <ruby> | Defines a ruby annotation (for East Asian typography) |
| <s> | Defines text that is no longer correct |
| <samp> | Defines sample output from a computer program |
| <small> | Defines smaller text |
| <strike> | Not supported in HTML5. Use <del> or <s> instead. Defines strikethrough text |
| <strong> | Defines important text |
| <sub> | Defines subscripted text |
| <sup> | Defines superscripted text |
| <template> | Defines a container for content that should be hidden when the page loads |
| <time> | Defines a specific time (or datetime) |
| <tt> | Not supported in HTML5. Use CSS instead. Defines teletype text |
| <u> | Defines some text that is unarticulated and styled differently from normal text |
| <var> | Defines a variable |
| <wbr> | Defines a possible line-break |
Forms and Input
| Tag | Description |
|---|---|
| <form> | Defines an HTML form for user input |
| <input> | Defines an input control |
| <textarea> | Defines a multiline input control (text area) |
| <button> | Defines a clickable button |
| <select> | Defines a drop-down list |
| <optgroup> | Defines a group of related options in a drop-down list |
| <option> | Defines an option in a drop-down list |
| <label> | Defines a label for an <input> element |
| <fieldset> | Groups related elements in a form |
| <legend> | Defines a caption for a <fieldset> element |
| <datalist> | Specifies a list of pre-defined options for input controls |
| <output> | Defines the result of a calculation |
Frames
| Tag | Description |
|---|---|
| <frame> | Not supported in HTML5. Defines a window (a frame) in a frameset |
| <frameset> | Not supported in HTML5. Defines a set of frames |
| <noframes> | Not supported in HTML5. Defines an alternate content for users that do not support frames |
| <iframe> | Defines an inline frame |
Images
| Tag | Description |
|---|---|
| <img> | Defines an image |
| <map> | Defines a client-side image map |
| <area> | Defines an area inside an image map |
| <canvas> | Used to draw graphics, on the fly, via scripting (usually JavaScript) |
| <figcaption> | Defines a caption for a <figure> element |
| <figure> | Specifies self-contained content |
| <picture> | Defines a container for multiple image resources |
| <svg> | Defines a container for SVG graphics |
Audio / Video
| Tag | Description |
|---|---|
| <audio> | Defines sound content |
| <source> | Defines multiple media resources for media elements (<video>, <audio> and <picture>) |
| <track> | Defines text tracks for media elements (<video> and <audio>) |
| <video> | Defines a video or movie |
Links
| Tag | Description |
|---|---|
| <a> | Defines a hyperlink |
| <link> | Defines the relationship between a document and an external resource (most used to link to style sheets) |
| <nav> | Defines navigation links |
Lists
| Tag | Description |
|---|---|
| <ul> | Defines an unordered list |
| <ol> | Defines an ordered list |
| <li> | Defines a list item |
| <dir> | Not supported in HTML5. Use <ul> instead. Defines a directory list |
| <dl> | Defines a description list |
| <dt> | Defines a term/name in a description list |
| <dd> | Defines a description of a term/name in a description list |
Tables
| Tag | Description |
|---|---|
| <table> | Defines a table |
| <caption> | Defines a table caption |
| <th> | Defines a header cell in a table |
| <tr> | Defines a row in a table |
| <td> | Defines a cell in a table |
| <thead> | Groups the header content in a table |
| <tbody> | Groups the body content in a table |
| <tfoot> | Groups the footer content in a table |
| <col> | Specifies column properties for each column within a <colgroup> element |
| <colgroup> | Specifies a group of one or more columns in a table for formatting |
Styles and Semantics
| Tag | Description |
|---|---|
| <style> | Defines style information for a document |
| <div> | Defines a section in a document |
| <span> | Defines a section in a document |
| <header> | Defines a header for a document or section |
| <footer> | Defines a footer for a document or section |
| <main> | Specifies the main content of a document |
| <section> | Defines a section in a document |
| <article> | Defines an article |
| <aside> | Defines content aside from the page content |
| <details> | Defines additional details that the user can view or hide |
| <dialog> | Defines a dialog box or window |
| <summary> | Defines a visible heading for a <details> element |
| <data> | Adds a machine-readable translation of a given content |
Meta Info
| Tag | Description |
|---|---|
| <head> | Defines information about the document |
| <meta> | Defines metadata about an HTML document |
| <base> | Specifies the base URL/target for all relative URLs in a document |
| <basefont> | Not supported in HTML5. Use CSS instead. Specifies a default color, size, and font for all text in a document |
Programming
| Tag | Description |
|---|---|
| <script> | Defines a client-side script |
| <noscript> | Defines an alternate content for users that do not support client-side scripts |
| <applet> | Not supported in HTML5. Use <embed> or <object> instead. Defines an embedded applet |
| <embed> | Defines a container for an external (non-HTML) application |
| <object> | Defines an embedded object |
| <param> | Defines a parameter for an object |
HTML<!DOCTYPE>
The declaration is not an HTML tag. It is an "information" to the browser about what document type to expect.
Valid HTML Elements in Different DOCTYPES
| Tag | HTML 5 | HTML 4 | XHTML |
|---|---|---|---|
| <a> | Yes | Yes | Yes |
| <abbr> | Yes | Yes | Yes |
| <acronym> | No | Yes | Yes |
| <address> | Yes | Yes | Yes |
| <applet> | No | Yes | No |
| <area> | Yes | Yes | No |
| <article> | Yes | No | No |
| <aside> | Yes | No | No |
| <audio> | Yes | No | No |
| <b> | Yes | Yes | Yes |
| <base> | Yes | Yes | Yes |
| <basefont> | No | Yes | No |
| <bdi> | Yes | No | No |
| <bdo> | Yes | Yes | No |
| <big> | No | Yes | Yes |
| <blockquote> | Yes | Yes | Yes |
| <body> | Yes | Yes | Yes |
| <br> | Yes | Yes | Yes |
| <button> | Yes | Yes | Yes |
| <canvas> | Yes | No | No |
| <caption> | Yes | Yes | Yes |
| <center> | No | Yes | No |
| <cite> | Yes | Yes | Yes |
| <code> | Yes | Yes | Yes |
| <col> | Yes | Yes | No |
| <colgroup> | Yes | Yes | No |
| <datalist> | Yes | No | No |
| <dd> | Yes | Yes | Yes |
| <del> | Yes | Yes | No |
| <details> | Yes | No | No |
| <dfn> | Yes | Yes | Yes |
| <dialog> | Yes | No | No |
| <dir> | No | Yes | No |
| <div> | Yes | Yes | Yes |
| <dl> | Yes | Yes | Yes |
| <dt> | Yes | Yes | Yes |
| <em> | Yes | Yes | Yes |
| <embed> | Yes | No | No |
| <fieldset> | Yes | Yes | Yes |
| <figcaption> | Yes | No | No |
| <figure> | Yes | No | No |
| <font> | No | Yes | No |
| <footer> | Yes | No | No |
| <form> | Yes | Yes | Yes |
| <frame> | No | No | No |
| <frameset> | No | Yes | No |
| <h1> to <h6> | Yes | Yes | Yes |
| <head> | Yes | Yes | Yes |
| <header> | Yes | No | No |
| <hr> | Yes | Yes | Yes |
| <html> | Yes | Yes | Yes |
| <i> | Yes | Yes | Yes |
| <iframe> | Yes | Yes | No |
| <img> | Yes | Yes | Yes |
| <input> | Yes | Yes | Yes |
| <ins> | Yes | Yes | No |
| <kbd> | Yes | Yes | Yes |
| <label> | Yes | Yes | Yes |
| <legend> | Yes | Yes | Yes |
| <li> | Yes | Yes | Yes |
| <link> | Yes | Yes | Yes |
| <main> | Yes | No | No |
| <map> | Yes | Yes | No |
| <mark> | Yes | No | No |
| <meta> | Yes | Yes | Yes |
| <meter> | Yes | No | No |
| <nav> | Yes | No | No |
| <noframes> | No | Yes | No |
| <noscript> | Yes | Yes | Yes |
| <object> | Yes | Yes | Yes |
| <ol> | Yes | Yes | Yes |
| <optgroup> | Yes | Yes | Yes |
| <option> | Yes | Yes | Yes |
| <output> | Yes | No | No |
| <p> | Yes | Yes | Yes |
| <param> | Yes | Yes | Yes |
| <pre> | Yes | Yes | Yes |
| <progress> | Yes | No | No |
| <q> | Yes | Yes | Yes |
| <rp> | Yes | No | No |
| <rt> | Yes | No | No |
| <ruby> | Yes | No | No |
| <s> | Yes | Yes | No |
| <samp> | Yes | Yes | Yes |
| <script> | Yes | Yes | Yes |
| <section> | Yes | No | No |
| <select> | Yes | Yes | Yes |
| <small> | Yes | Yes | Yes |
| <source> | Yes | No | No |
| <span> | Yes | Yes | Yes |
| <strike> | No | Yes | No |
| <strong> | Yes | Yes | Yes |
| <style> | Yes | Yes | Yes |
| <sub> | Yes | Yes | Yes |
| <summary> | Yes | No | No |
| <sup> | Yes | Yes | Yes |
| <table> | Yes | Yes | Yes |
| <tbody> | Yes | Yes | No |
| <td> | Yes | Yes | Yes |
| <textarea> | Yes | Yes | Yes |
| <tfoot> | Yes | Yes | No |
| <th> | Yes | Yes | Yes |
| <thead> | Yes | Yes | No |
| <time> | Yes | No | No |
| <title> | Yes | Yes | Yes |
| <tr> | Yes | Yes | Yes |
| <track> | Yes | No | No |
| <tt> | No | Yes | Yes |
| <u> | Yes | Yes | No |
| <ul> | Yes | Yes | Yes |
| <var> | Yes | Yes | Yes |
| <video> | Yes | No | No |
| <wbr> | Yes | No | No |
HTML URL Encoding Reference
URL - Uniform Resource Locator
Web browsers request pages from web servers by using a URL.
URL Encoding (Percent Encoding)
URLs can only be sent over the Internet using the ASCII character-set.
Since URLs often contain characters outside the ASCII set, the URL has to be converted into a valid ASCII format.
URL encoding replaces unsafe ASCII characters with a "%" followed by two hexadecimal digits.
URLs cannot contain spaces. URL encoding normally replaces a space with a plus (+) sign or with %20.
URL Encoding Functions
PHP has the rawurlencode() function, and ASP has the Server.URLEncode() function.
In JavaScript you can use the encodeURIComponent() function.
ASCII Encoding Reference
Your browser will encode input, according to the character-set used in your page.
The default character-set in HTML5 is UTF-8.
| Character | From Windows-1252 | From UTF-8 |
|---|---|---|
| space | %20 | %20 |
| ! | %21 | %21 |
| " | %22 | %22 |
| # | %23 | %23 |
| $ | %24 | %24 |
| % | %25 | %25 |
| & | %26 | %26 |
| ' | %27 | %27 |
| ( | %28 | %28 |
| ) | %29 | %29 |
| * | %2A | %2A |
| + | %2B | %2B |
| , | %2C | %2C |
| - | %2D | %2D |
| . | %2E | %2E |
| / | %2F | %2F |
| 0 | %30 | %30 |
| 1 | %31 | %31 |
| 2 | %32 | %32 |
| 3 | %33 | %33 |
| 4 | %34 | %34 |
| 5 | %35 | %35 |
| 6 | %36 | %36 |
| 7 | %37 | %37 |
| 8 | %38 | %38 |
| 9 | %39 | %39 |
| : | %3A | %3A |
| ; | %3B | %3B |
| < | %3C | %3C |
| = | %3D | %3D |
| > | %3E | %3E |
| ? | %3F | %3F |
| @ | %40 | %40 |
| A | %41 | %41 |
| B | %42 | %42 |
| C | %43 | %43 |
| D | %44 | %44 |
| E | %45 | %45 |
| F | %46 | %46 |
| G | %47 | %47 |
| H | %48 | %48 |
| I | %49 | %49 |
| J | %4A | %4A |
| K | %4B | %4B |
| L | %4C | %4C |
| M | %4D | %4D |
| N | %4E | %4E |
| O | %4F | %4F |
| P | %50 | %50 |
| Q | %51 | %51 |
| R | %52 | %52 |
| S | %53 | %53 |
| T | %54 | %54 |
| U | %55 | %55 |
| V | %56 | %56 |
| W | %57 | %57 |
| X | %58 | %58 |
| Y | %59 | %59 |
| Z | %5A | %5A |
| [ | %5B | %5B |
| \ | %5C | %5C |
| ] | %5D | %5D |
| ^ | %5E | %5E |
| _ | %5F | %5F |
| ` | %60 | %60 |
| a | %61 | %61 |
| b | %62 | %62 |
| c | %63 | %63 |
| d | %64 | %64 |
| e | %65 | %65 |
| f | %66 | %66 |
| g | %67 | %67 |
| h | %68 | %68 |
| i | %69 | %69 |
| j | %6A | %6A |
| k | %6B | %6B |
| l | %6C | %6C |
| m | %6D | %6D |
| n | %6E | %6E |
| o | %6F | %6F |
| p | %70 | %70 |
| q | %71 | %71 |
| r | %72 | %72 |
| s | %73 | %73 |
| t | %74 | %74 |
| u | %75 | %75 |
| v | %76 | %76 |
| w | %77 | %77 |
| x | %78 | %78 |
| y | %79 | %79 |
| z | %7A | %7A |
| { | %7B | %7B |
| | | %7C | %7C |
| } | %7D | %7D |
| ~ | %7E | %7E |
| %7F | %7F | |
| € | %80 | %E2%82%AC |
| | %81 | %81 |
| ‚ | %82 | %E2%80%9A |
| ƒ | %83 | %C6%92 |
| „ | %84 | %E2%80%9E |
| … | %85 | %E2%80%A6 |
| † | %86 | %E2%80%A0 |
| ‡ | %87 | %E2%80%A1 |
| ˆ | %88 | %CB%86 |
| ‰ | %89 | %E2%80%B0 |
| Š | %8A | %C5%A0 |
| ‹ | %8B | %E2%80%B9 |
| Π| %8C | %C5%92 |
| | %8D | %C5%8D |
| Ž | %8E | %C5%BD |
| | %8F | %8F |
| | %90 | %C2%90 |
| ‘ | %91 | %E2%80%98 |
| ’ | %92 | %E2%80%99 |
| “ | %93 | %E2%80%9C |
| ” | %94 | %E2%80%9D |
| • | %95 | %E2%80%A2 |
| – | %96 | %E2%80%93 |
| — | %97 | %E2%80%94 |
| ˜ | %98 | %CB%9C |
| ™ | %99 | %E2%84 |
| š | %9A | %C5%A1 |
| › | %9B | %E2%80 |
| œ | %9C | %C5%93 |
| | %9D | %9D |
| ž | %9E | %C5%BE |
| Ÿ | %9F | %C5%B8 |
| %A0 | %C2%A0 | |
| ¡ | %A1 | %C2%A1 |
| ¢ | %A2 | %C2%A2 |
| £ | %A3 | %C2%A3 |
| ¤ | %A4 | %C2%A4 |
| ¥ | %A5 | %C2%A5 |
| ¦ | %A6 | %C2%A6 |
| § | %A7 | %C2%A7 |
| ¨ | %A8 | %C2%A8 |
| © | %A9 | %C2%A9 |
| ª | %AA | %C2%AA |
| « | %AB | %C2%AB |
| ¬ | %AC | %C2%AC |
| | %AD | %C2%AD |
| ® | %AE | %C2%AE |
| ¯ | %AF | %C2%AF |
| ° | %B0 | %C2%B0 |
| ± | %B1 | %C2%B1 |
| ² | %B2 | %C2%B2 |
| ³ | %B3 | %C2%B3 |
| ´ | %B4 | %C2%B4 |
| µ | %B5 | %C2%B5 |
| ¶ | %B6 | %C2%B6 |
| · | %B7 | %C2%B7 |
| ¸ | %B8 | %C2%B8 |
| ¹ | %B9 | %C2%B9 |
| º | %BA | %C2%BA |
| » | %BB | %C2%BB |
| ¼ | %BC | %C2%BC |
| ½ | %BD | %C2%BD |
| ¾ | %BE | %C2%BE |
| ¿ | %BF | %C2%BF |
| À | %C0 | %C3%80 |
| Á | %C1 | %C3%81 |
| Â | %C2 | %C3%82 |
| Ã | %C3 | %C3%83 |
| Ä | %C4 | %C3%84 |
| Å | %C5 | %C3%85 |
| Æ | %C6 | %C3%86 |
| Ç | %C7 | %C3%87 |
| È | %C8 | %C3%88 |
| É | %C9 | %C3%89 |
| Ê | %CA | %C3%8A |
| Ë | %CB | %C3%8B |
| Ì | %CC | %C3%8C |
| Í | %CD | %C3%8D |
| Î | %CE | %C3%8E |
| Ï | %CF | %C3%8F |
| Ð | %D0 | %C3%90 |
| Ñ | %D1 | %C3%91 |
| Ò | %D2 | %C3%92 |
| Ó | %D3 | %C3%93 |
| Ô | %D4 | %C3%94 |
| Õ | %D5 | %C3%95 |
| Ö | %D6 | %C3%96 |
| × | %D7 | %C3%97 |
| Ø | %D8 | %C3%98 |
| Ù | %D9 | %C3%99 |
| Ú | %DA | %C3%9A |
| Û | %DB | %C3%9B |
| Ü | %DC | %C3%9C |
| Ý | %DD | %C3%9D |
| Þ | %DE | %C3%9E |
| ß | %DF | %C3%9F |
| à | %E0 | %C3%A0 |
| á | %E1 | %C3%A1 |
| â | %E2 | %C3%A2 |
| ã | %E3 | %C3%A3 |
| ä | %E4 | %C3%A4 |
| å | %E5 | %C3%A5 |
| æ | %E6 | %C3%A6 |
| ç | %E7 | %C3%A7 |
| è | %E8 | %C3%A8 |
| é | %E9 | %C3%A9 |
| ê | %EA | %C3%AA |
| ë | %EB | %C3%AB |
| ì | %EC | %C3%AC |
| í | %ED | %C3%AD |
| î | %EE | %C3%AE |
| ï | %EF | %C3%AF |
| ð | %F0 | %C3%B0 |
| ñ | %F1 | %C3%B1 |
| ò | %F2 | %C3%B2 |
| ó | %F3 | %C3%B3 |
| ô | %F4 | %C3%B4 |
| õ | %F5 | %C3%B5 |
| ö | %F6 | %C3%B6 |
| ÷ | %F7 | %C3%B7 |
| ø | %F8 | %C3%B8 |
| ù | %F9 | %C3%B9 |
| ú | %FA | %C3%BA |
| û | %FB | %C3%BB |
| ü | %FC | %C3%BC |
| ý | %FD | %C3%BD |
| þ | %FE | %C3%BE |
| ÿ | %FF | %C3%BF |
URL Encoding Reference
The ASCII control characters %00-%1F were originally designed to control hardware devices.
| ASCII Character | Description | URL-encoding |
|---|---|---|
| NUL | null character | %00 |
| SOH | start of header | %01 |
| STX | start of text | %02 |
| ETX | end of text | %03 |
| EOT | end of transmission | %04 |
| ENQ | enquiry | %05 |
| ACK | acknowledge | %06 |
| BEL | bell (ring) | %07 |
| BS | backspace | %08 |
| HT | horizontal tab | %09 |
| LF | line feed | %0A |
| VT | vertical tab | %0B |
| FF | form feed | %0C |
| CR | carriage return | %0D |
| SO | shift out | %0E |
| SI | shift in | %0F |
| DLE | data link escape | %10 |
| DC1 | device control 1 | %11 |
| DC2 | device control 2 | %12 |
| DC3 | device control 3 | %13 |
| DC4 | device control 4 | %14 |
| NAK | negative acknowledge | %15 |
| SYN | synchronize | %16 |
| ETB | end transmission block | %17 |
| CAN | cancel | %18 |
| EM | end of medium | %19 |
| SUB | substitute | %1A |
| ESC | escape | %1B |
| FS | file separator | %1C |
| GS | group separator | %1D |
| RS | record separator | %1E |
| US | unit separator | %1F |
HTTP Status Messages
HTML Error Messages
Information
| Message: | Description: |
|---|---|
| 100 Continue | The server has received the request headers, and the client should proceed to send the request body |
| 101 Switching Protocols | The requester has asked the server to switch protocols |
| 103 Checkpoint | Used in the resumable requests proposal to resume aborted PUT or POST requests |
Successful
| Message: | Description: |
|---|---|
| 200 OK | The request is OK (this is the standard response for successful HTTP requests) |
| 201 Created | The request has been fulfilled, and a new resource is created |
| 202 Accepted | The request has been accepted for processing, but the processing has not been completed |
| 203 Non-Authoritative Information | The request has been successfully processed, but is returning information that may be from another source |
| 204 No Content | The request has been successfully processed, but is not returning any content |
| 205 Reset Content | The request has been successfully processed, but is not returning any content, and requires that the requester reset the document view |
| 206 Partial Content | The server is delivering only part of the resource due to a range header sent by the client |
Redirection
| Message: | Description: |
|---|---|
| 300 Multiple Choices | A link list. The user can select a link and go to that location. Maximum five addresses |
| 301 Moved Permanently | The requested page has moved to a new URL |
| 302 Found | The requested page has moved temporarily to a new URL |
| 303 See Other | The requested page can be found under a different URL |
| 304 Not Modified | Indicates the requested page has not been modified since last requested |
| 306 Switch Proxy | No longer used |
| 307 Temporary Redirect | The requested page has moved temporarily to a new URL |
| 308 Resume Incomplete | Used in the resumable requests proposal to resume aborted PUT or POST requests |
Client Error
| Message: | Description: |
|---|---|
| 400 Bad Request | The request cannot be fulfilled due to bad syntax |
| 401 Unauthorized | The request was a legal request, but the server is refusing to respond to it. For use when authentication is possible but has failed or not yet been provided |
| 402 Payment Required | Reserved for future use |
| 403 Forbidden | The request was a legal request, but the server is refusing to respond to it |
| 404 Not Found | The requested page could not be found but may be available again in the future |
| 405 Method Not Allowed | A request was made of a page using a request method not supported by that page |
| 406 Not Acceptable | The server can only generate a response that is not accepted by the client |
| 407 Proxy Authentication Required | The client must first authenticate itself with the proxy |
| 408 Request Timeout | The server timed out waiting for the request |
| 409 Conflict | The request could not be completed because of a conflict in the request |
| 410 Gone | The requested page is no longer available |
| 411 Length Required | The "Content-Length" is not defined. The server will not accept the request without it |
| 412 Precondition Failed | The precondition given in the request evaluated to false by the server |
| 413 Request Entity Too Large | The server will not accept the request, because the request entity is too large |
| 414 Request-URI Too Long | The server will not accept the request, because the URL is too long. Occurs when you convert a POST request to a GET request with a long query information |
| 415 Unsupported Media Type | The server will not accept the request, because the media type is not supported |
| 416 Requested Range Not Satisfiable | The client has asked for a portion of the file, but the server cannot supply that portion |
| 417 Expectation Failed | The server cannot meet the requirements of the Expect request-header field |
Server Error
| Message: | Description: |
|---|---|
| 500 Internal Server Error | A generic error message, given when no more specific message is suitable |
| 501 Not Implemented | The server either does not recognize the request method, or it lacks the ability to fulfill the request |
| 502 Bad Gateway | The server was acting as a gateway or proxy and received an invalid response from the upstream server |
| 503 Service Unavailable | The server is currently unavailable (overloaded or down) |
| 504 Gateway Timeout | The server was acting as a gateway or proxy and did not receive a timely response from the upstream server |
| 505 HTTP Version Not Supported | The server does not support the HTTP protocol version used in the request |
| 511 Network Authentication Required | The client needs to authenticate to gain network access |
HTTP Request Methods
What is HTTP?
The Hypertext Transfer Protocol (HTTP) is designed to enable communications between clients and servers.
HTTP works as a request-response protocol between a client and server.
HTTP Methods
- GET
- POST
- PUT
- HEAD
- DELETE
- PATCH
- OPTIONS
The two most common HTTP methods are: GET and POST.
The GET Method
GET is used to request data from a specified resource.
GET is one of the most common HTTP methods.
Some other notes on GET requests:
- GET requests can be cached
- GET requests remain in the browser history
- GET requests can be bookmarked
- GET requests should never be used when dealing with sensitive data
- GET requests have length restrictions
- GET requests are only used to request data (not modify)
The POST Method
POST is used to send data to a server to create/update a resource.
The data sent to the server with POST is stored in the request body of the HTTP request
Some other notes on POST requests:
- POST requests are never cached
- POST requests do not remain in the browser history
- POST requests cannot be bookmarked
- POST requests have no restrictions on data length
The PUT Method
PUT is used to send data to a server to create/update a resource.
The HEAD Method
HEAD is almost identical to GET, but without the response body.
In other words, if GET /users returns a list of users, then HEAD /users will make the same request but will not return the list of users.
The DELETE Method
The DELETE method deletes the specified resource.
The OPTIONS Method
The OPTIONS method describes the communication options for the target resource.
Keyboard Shortcuts
Basic Shortcuts
| Description | Windows | Mac OS |
|---|---|---|
| Edit menu | Alt + E | Ctrl + F2 + F |
| File menu | Alt + F | Ctrl + F2 + E |
| View menu | Alt + V | Ctrl + F2 + V |
| Select all text | Ctrl + A | Cmd + A |
| Copy text | Ctrl + C | Cmd + C |
| Find text | Ctrl + F | Cmd + F |
| Find and replace text | Ctrl + H | Cmd + F |
| New Document | Ctrl + N | Cmd + N |
| Open a file | Ctrl + O | Cmd + O |
| Print options | Ctrl + P | Cmd + P |
| Save file | Ctrl + S | Cmd + S |
| Paste text | Ctrl + V | Cmd + V |
| Cut text | Ctrl + X | Cmd + X |
| Redo text | Ctrl + Y | Shift + Cmd + Z |
| Undo text | Ctrl + Z | Cmd + Z |
Text Editing
| Description | Windows | Mac OS |
|---|---|---|
| Cursor Movement | ||
| Go to the right or to the beginning of next line break | Right Arrow | Right Arrow |
| Go to the left or to the end of previous line break | Left Arrow | Left Arrow |
| Go up one row | Up Arrow | Up Arrow |
| Go down one row | Down Arrow | Down Arrow |
| Go to the beginning of the current line | Home | Cmd + Left Arrow |
| Go to the end of the current line | End | Cmd + Right Arrow |
| Go to the beginning of the document | Ctrl + Home | Cmd + Up Arrow |
| Go to the end of the document | Ctrl + End | Cmd + Down Arrow |
| Move up one frame | Page Up | Fn + Up Arrow |
| Move down one frame | Page Down | Fn + Down Arrow |
| Go to beginning of previous word | Ctrl + Left Arrow | Option + Left Arrow |
| Go to beginning of next word | Ctrl + Right Arrow | Option + Right Arrow |
| Go to beginning of line break | Ctrl + Up Arrow | Cmd + Left Arrow |
| Go to end of line break | Ctrl + Down Arrow | Cmd + Right Arrow |
| Text Selection | ||
| Select characters to the left | Shift + Left Arrow | Shift + Left Arrow |
| Select characters to the right | Shift + Right Arrow | Shift + Right Arrow |
| Select lines upwards | Shift + Up Arrow | Shift + Up Arrow |
| Select lines downwards | Shift + Down Arrow | Shift + Down Arrow |
| Select words to the left | Shift + Ctrl + Left | Shift + Opt + Left |
| Select words to the right | Shift + Ctrl + Right | Shift + Opt + Right |
| Select paragraphs to the left | Shift + Ctrl + Up | Shift + Opt + Up |
| Select paragraphs to the right | Shift + Ctrl + Down | Shift + Opt + Down |
| Select text between the cursor and the beginning of the current line | Shift + Home | Cmd + Shift + Left Arrow |
| Select text between the cursor and the end of the current line | Shift + End | Cmd + Shift + Right Arrow |
| Select text between the cursor and the beginning of the document | Shift + Ctrl + Home | Cmd + Shift + Up Arrow or Cmd + Shift + Fn + Left Arrow |
| Select text between the cursor and the end of the document | Shift + Ctrl + End | Cmd + Shift + Down Arrow or Cmd + Shift + Fn + Right Arrow |
| Select one frame at a time of text above the cursor | Shift + Page Up | Shift + Fn + Up Arrow |
| Select one frame at a time of text below the cursor | Shift + Page Down | Shift + Fn + Down Arrow |
| Select all text | Ctrl + A | Cmd + A |
| Find text | Ctrl + F | Cmd + F |
| Text Formatting | ||
| Make selected text bold | Ctrl + B | Cmd + B |
| Make selected text italic | Ctrl + I | Cmd + I |
| Underline selected text | Ctrl + U | Cmd + U |
| Make selected text superscript | Ctrl + Shift + = | Cmd + Shift + = |
| Make selected text subscript | Ctrl + = | Cmd + = |
| Text Editing | ||
| Delete characters to the left | Backspace | Backspace |
| Delete characters to the right | Delete | Fn + Backspace |
| Delete words to the right | Ctrl + Del | Cmd + Backspace |
| Delete words to the left | Ctrl + Backspace | Cmd + Fn + Backspace |
| Indent | Tab | Tab |
| Outdent | Shift + Tab | Shift + Tab |
| Copy text | Ctrl + C | Cmd + C |
| Find and replace text | Ctrl + H | Cmd + F |
| Paste text | Ctrl + V | Cmd + V |
| Cut text | Ctrl + X | Cmd + X |
| Redo text | Ctrl + Y | Shift + Cmd + Z |
| Undo text | Ctrl + Z | Cmd + Z |
Web Browsers
| Description | Windows | Mac OS |
|---|---|---|
| Navigation | ||
| Scroll down a frame | Space or Page Down | Space or Fn + Down Arrow |
| Scroll up a frame | Shift + Space or Page Up | Shift + Space or Fn + Up Arrow |
| Go to bottom of the page | End | Cmd + Down Arrow |
| Go to top of the page | Home | Cmd + Up Arrow |
| Go back | Alt + Left Arrow or Backspace | Cmd + Left Arrow |
| Go forward | Alt + Right Arrow or Shift + Backspace | Cmd + Right Arrow |
| Refresh a webpage | F5 | Cmd + R |
| Refresh a webpage (no cache) | Ctrl + F5 | Cmd + Shift + R |
| Stop | Esc | Esc |
| Toggle full-screen | F11 | Cmd + Shift + F |
| Zoom in | Ctrl + + | Cmd + + |
| Zoom out | Ctrl + - | Cmd + - |
| Zoom 100% (default) | Ctrl + 0 | Cmd + 0 |
| Open homepage | Alt + Home | Option + Home or Option + Fn + Left Arrow |
| Find text | Ctrl + F | Cmd + F |
| Tab / Window Management | ||
| Open a new tab | Ctrl + T | Cmd + T |
| Close current tab | Ctrl + W | Cmd + W |
| Close all tabs | Ctrl + Shift + W | Cmd + Q |
| Close all tabs except the current tab | Ctrl + Alt + F4 | Cmd + Opt + W |
| Go to next tab | Ctrl + Tab | Control + Tab or Cmd + Shift + Right Arrow |
| Go to previous tab | Ctrl + Shift + Tab | Shift + Control + Tab or Cmd + Shift + Left Arrow |
| Go to a specific tab number | Ctrl + 1-8 | Cmd + 1-8 |
| Go to the last tab | Ctrl + 9 | Cmd + 9 |
| Reopen the last closed tab | Ctrl + Shift + T | Cmd + Shift + T |
| Open a new window | Ctrl + N | Cmd + N |
| Close current window | Alt + F4 | Cmd + W |
| Go to next window | Alt + Tab | Cmd + Tab |
| Go to previous window | Alt + Shift + Tab | Cmd + Shift + Tab |
| Reopen the last closed window | Ctrl + Shift + N | |
| Open links in a new tab in the background | Ctrl + Click | Cmd + Click |
| Open links in a new tab in the foreground | Ctrl + Shift + Click | Cmd + Shift + Click |
| Print current webpage | Ctrl + P | Cmd + P |
| Save current webpage | Ctrl + S | Cmd + S |
| Address Bar | ||
| Cycle between toolbar, search bar, and page elements | Tab | Tab |
| Go to browser's address bar | Ctrl + L or Alt + D | Cmd + L |
| Focus and select the browser's search bar | Ctrl + E | Cmd + E / Cmd + K |
| Open the address bar location in a new tab | Alt + Enter | Opt + Enter |
| Display a list of previously typed addresses | F4 | |
| Add "www." to the beginning and ".com" to the end of the text typed in the address bar (e.g., type "w3schools" and press Ctrl + Enter to open "www.w3schools.com") | Ctrl + Enter | Cmd + Enter or Control + Enter |
| Bookmarks | ||
| Open the bookmarks menu | Ctrl + B | Cmd + B |
| Add bookmark for current page | Ctrl + D | Cmd + Opt + B or Cmd + Shift + B |
| Open browsing history | Ctrl + H | Cmd + Shift + H or Cmd + Y |
| Open download history | Ctrl + J | Cmd + J or Cmd + Shift + J |
Screenshots
| Description | Windows | Mac OS |
|---|---|---|
| Save screenshot of the whole screen as file | Cmd + Shift + 3 | |
| Copy screenshot of the whole screen to the clipboard | PrtScr (Print Screen) or Ctrl + PrtScr | Cmd + Ctrl + Shift + 3 |
| Save screenshot of window as file | Cmd + Shift + 4, then Space | |
| Copy screenshot of window to the clipboard | Alt + PrtScr | Cmd + Ctrl + Shift + 4, then Space |
| Copy screenshot of wanted area to the clipboard | Cmd + Ctrl + Shift + 4 | |
| Save screenshot of wanted area as file | Cmd + Shift + 4 |
HTML Tag
- All HTML tags must enclosed within < > these brackets.
- Every tag in HTML perform different tasks.
- If you have used an open tag <tag>, then you must use a close tag </tag>
1.HTML <!--...--> Tag

2.HTML <!DOCTYPE> Declaration
- <!DOCTYPE html>

<!DOCTYPE> declaration is NOT case sensitive.3.HTML <a> Tag
The <a> tag defines a hyperlink, which is used to link from one page to another.
The most important attribute of the <a> element is the href attribute, which indicates the link's destination.
Syntax:
- <a href ="...........">Link Text</a>
Example:
By default, links will appear as follows in all browsers:
- An unvisited link is underlined and blue
- A visited link is underlined and purple
- An active link is underlined and red
Note: If the<a>tag has nohrefattribute, it is only a placeholder for a hyperlink.

4.HTML <abbr> TagHTML <abbr> tag is used to represent an acronym or abbreviation of a longer word or phrase, such as www, HTML, HTTP, etc. The content written between <abbr> tags renders with dotted underline in some browser.Syntax:
- <abbr title="HyperText Markup language">HTML</abbr>
Example:5.HTML <acronym> Tag
Not Supported in HTML5.
The<acronym>tag was used in HTML 4 to define an acronym.Syntax:<acronym title="Hello World">hw</acronym>Example:


6.HTML <address> Tag
The
<address>tag defines the contact information for the author/owner of a document or an article.The contact information can be an email address, URL, physical address, phone number, social media handle, etc.
The text in the
<address>element usually renders in italic, and browsers will always add a line break before and after the<address>element.Example:7.HTML <applet> Tag
Not Supported in HTML5.
HTML<applet>tag was used to embed the Java applet in an HTML document. This element has been deprecated in HTML 4.0 and instead of it we can use<object>and newly added element<embed>.Plug-ins
Plug-ins are a computer programs that extend the standard functionality of the browser.
Plug-ins have been used for many different purposes:
- Run Java applets
- Run ActiveX controls
- Display Flash movies
- Display maps
- Scan for viruses
- Verify a bank id
Note: TheExample:To embed objects, you can use both the<embed>tag and the<object>tags:Example of embed:Example of object:
8.HTML <area> Tag
The
<area>tag defines an area inside an image map (an image map is an image with clickable areas).
<area>elements are always nested inside a<map>tag.The <area> element is defined with (required) attributes shape and coords. The shape attribute specifies the shape of the area such as rectangle, circle, square, and polygon. The coords attribute defines the coordinates of areas inside the image.
Image- Map:
An image-map is defined as a graphical image with active areas so that when user click on those area, it can link to different destinations.
Example:Attributes
Attribute Value Description alt text Specifies an alternate text for the
area. Required if the href attribute
is presentcoords coordinates Specifies the coordinates of the
areadownload filename Specifies that the target will be
downloaded when a user clicks
on the hyperlinkhref URL Specifies the hyperlink target for
the areahreflang language_code Specifies the language of the
target URLmedia media query Specifies what media/device the
target URL is optimized forreferrerpolicy no-referrer
no-referrer-when-downgrade
origin
origin-when-cross-origin
same-origin
strict-origin-when-cross-origin
unsafe-urlSpecifies which referrer
information to send with the
linkrel alternate
author
bookmark
help
license
next
nofollow
noreferrer
prefetch
prev
search
tagSpecifies the relationship between
the current document and the
target URLshape default
rect
circle
polySpecifies the shape of the area target _blank
_parent
_self
_top
framenameSpecifies where to open the
target URLtype media_type Specifies the media type of the
target URLusemapattribute in<img>is associated with the<map>element'snameattribute, and creates a relationship between the image and the map.9.HTML <article> Tag
The HTML <article> tag defines an independent self-contained content in a document, page, application or a site.Potential sources for the
<article>element:
- Forum post
- Blog post
- News story
Example:Note: The<article>element does not render as anything special in a browser.10.HTML <aside> Tag
The aside content should be indirectly related to the surrounding content.The HTML<aside>tag provides information about the main content.


Example:

Note: The
<aside> content is often placed as a sidebar in a document11.HTML <audio>Tag
<audio> tag contains one or more <source> tags with different audio sources. The browser will choose the first source it supports.- mp3
- wav
- ogg
Example:
Attributes

| Attribute | Value | Description |
|---|---|---|
| autoplay | autoplay | Specifies that the audio will start playing as soon as it is ready |
| controls | controls | Specifies that audio controls should be displayed (such as a play/pause button etc) |
| loop | loop | Specifies that the audio will start over again, every time it is finished |
| muted | muted | Specifies that the audio output should be muted |
| preload | auto metadata none | Specifies if and how the author thinks the audio should be loaded when the page loads |
| src | URL | Specifies the URL of the audio file |
The available MIME type HTML audio tag is given below.
| Audio Format | MIME Type |
|---|---|
| mp3 | audio/mpeg |
| ogg | audio/ogg |
| wav | audio/wav |
12.HTML <b> Tag
<b> tag specifies bold text without any extra importance.<b> tag is used to display the written text in bold format. It is strictly a presentational element.Example:
Default CSS Settings
13.HTML <base> TagThe
<base>tag specifies the base URL and/or target for all relative URLs in a document.The
<base>tag must have either an href or a target attribute present, or both.There can only be one single
<base>element in a document, and it must be inside the <head> element.Example:Attributes
Attribute Value Description href URL Specifies the base URL for all relative URLs in the
pagetarget _blank
_parent
_self
_topSpecifies the default target for all hyperlinks and forms
in the pageDefault CSS Settings
None.
14.HTML <basefont> Tag
Not Supported in HTML5.
The<basefont>tag was used in HTML 4 to specify a default text-color, font-size or font-family for all the text in an HTML document.Example:Attributes
Attribute Value Description color color Specify the default color of all text within an HTML document. (Not Supported in HTML5) face font-family Specify the default font face for the text in the document. (Not Supported in HTML5) size number Specify the size of the text. (Not Supported in HTML5) 15.HTML <bdi> Tag
HTML<bdi>tag stands for Bidirectional Isolate Element. It is used to inform the browser to isolate the span of text which may be formatted in opposite directions than the surrounding text.This element is useful when embedding user-generated content with an unknown text direction.Example:
16.HTML <bdo> Tag
BDO stands for Bi-Directional Override.
The
<bdo>tag is used to override the current text direction.Example:Attributes
Attribute Value Description dir ltr
rtlRequired. Specifies the text direction of the text
inside the <bdo> elementDefault CSS Settings
17.HTML <big> Tag
Not Supported in HTML5.
HTML<big>tag was used to increase the text font size one level bigger than the document's base font size or surrounding text size, such as small to medium, medium to large, etc.Example:Attributes
The <big> element does not contain any specific attribute.18.HTML <blockquote> TagThe
<blockquote>tag specifies a section that is quoted from another source.Browsers usually indent
<blockquote>elements (look at example below to see how to remove the indentation).If you want to insert a long quote then use <blockquote> and for short or inline quote use <q> tag.Default CSS Settings
19.HTML <body> Tag
The
<body>tag defines the document's body.The
<body>element contains all the contents of an HTML document, such as headings, paragraphs, images, hyperlinks, tables, lists, etc.The <body> must be the second element after the <head> tag or it should be placed between </head> and </html> tags.
Note: There can only be one
<body>element in an HTML document.Example:Attributes
Attribute Value Description alink color It defines the color of the active link in a document. (Not supported in HTML5) background URL It determines the background image for the document. (Not supported in HTML5) bgcolor color It determines the background color of the content. (Not supported in HTML5) link color It determines the color of the unvisited link. (Not supported in HTML5) text color It determines the color of the text in the document. (Not supported in HTML5) vlink color It determines the color of the visited link. (Not supported in HTML5) onload Function call on page loading onunload Function call when user leaves the page onfocus Function call when document receives focus by user. onblur Function call when document loses focus by user. Default CSS Settings
20.HTML <br> Tag
The<br>tag in HTML document is used to create a line break in a text.It is generally used in poem or address where the division of line is necessary. It is an empty tag, which means it does not need a company of end tag.Note: Use the<br>tag to enter line breaks, not to add space between paragraphs.Example:Default CSS Settings
None.
21.HTML <button> Tag
The<button>tag is used to create a clickable button within HTML form on your webpage.Inside a<button>element you can put text (and tags like<i>,<b>,<strong>,<br>,<img>, etc.). That is not possible with a button created with the <input> element!Note: Always specify thetypeattribute for a<button>element, to tell browsers what type of button it is.Example:Attributes
Attribute Value Description autofocus autofocus Specifies that a button should automatically get focus when the page loads disabled disabled Specifies that a button should be disabled form form_id Specifies which form the button belongs to formaction URL Specifies where to send the form-data when a form is submitted. Only for type="submit" formenctype application/x-www-form-urlencoded
multipart/form-data
text/plainSpecifies how form-data should be encoded before sending it to a server. Only for type="submit" formmethod get
postSpecifies how to send the form-data (which HTTP method to use). Only for type="submit" formnovalidate formnovalidate Specifies that the form-data should not be validated on submission. Only for type="submit" formtarget _blank
_self
_parent
_top
framenameSpecifies where to display the response after submitting the form. Only for type="submit" name name Specifies a name for the button type button
reset
submitSpecifies the type of button value text Specifies an initial value for the button Default CSS Settings
None.
22.HTML <canvas> Tag
The HTML<canvas>element provides HTML a bitmapped surface to work with.The
<canvas>tag is used to draw graphics, on the fly, via scripting (usually JavaScript).The
<canvas>tag is transparent, and is only a container for graphics, you must use a script to actually draw the graphics.Example:Attributes
Default CSS Settings
23.HTML <caption> Tag
HTML<caption>tag is used to add a caption or title of an HTML table. It should be used inside the <table> element and just after the <table> start tag. A table may contain only one<caption>element.Note: By default, a table caption will be center-aligned above a table. However, the CSS properties text-align and caption-side can be used to align and place the caption.Example:Attributes
Attribute Value Description align
- top
- bottom
- left
- right
It aligns the caption with respect to table Default CSS Settings
24.HTML <center> Tag
Not Supported in HTML5.
The<center>tag was used in HTML4 to center-align text.The HTML<center>tag is a block level element which contains both block level and inline contents within it.Example:Attributes
HTML <center> tag does not contain any specific attribute in HTML but it supports the Global Attribute.25.HTML <cite> Tag
HTML<cite>tag specifies a citation, it provides reference or title to a creative work, quoted content, books, websites, a research paper, a blog-spot, painting, etc.Note: The text in the
<cite>element usually renders in italic.Example:Default CSS Settings
26.HTML <code> Tag
The<code>tag is used to define a piece of computer code. The content inside is displayed in the browser's default monospace font.HTML phrase tags
Tag Description <em> displays emphasized text <strong> displays important text <dfn> defines a definition term <code> defines a piece of computer code <samp> specifies a sample output from a computer program <kbd> defines keyboard input <var> defines a variable Example:Default CSS Settings
27.HTML <col> Tag
The
<col>tag specifies column properties for each column within a <colgroup> element.The
<col>tag is useful for applying styles to entire columns, instead of repeating the styles for each cell, for each row.Example:Attributes
Attribute Value Description align
- left
- center
- right
- justify
- char
It specifies the horizontal alignment of each column cell.
(Not supported in HTML5).char character It specifies the alignment of content based on Characters in a column. It will be ignored if align is not set to char. (Not supported in HTML5). charoff number It sets the number of characters to offset the column data from the alignment character specified by the char attribute. (Not supported in HTML5). span number It specifies the number of the columns which a valign
- top
- middle
- bottom
- baseline
It specifies the vertical alignment of the columns.
(Not supported in HTML5).width
- %
- Pixels
- relative_length
It specifies the width of the column.
(Not supported in HTML5).Default CSS Settings
28.HTML <colgroup> TagThe<colgroup>tag specifies a group of one or more columns in a table for formatting.To define different properties to a column within a<colgroup>, use the <col> tag within the<colgroup>tag.Note:The<colgroup>tag must be a child of a <table> element, after any <caption> elements and before any <thead>, <tbody>, <tfoot>, and <tr> elements.Example:Attributes
Attribute Value Description align
- left
- center
- right
- justify
- char
It specifies the alignment of the column content. (Not supported in HTML5). char character It specifies the alignment of the content in a column group to the character. (Not supported in HTML5). charoff number It sets the number of characters to offset the column data from the alignment character specified by the char attribute. (Not supported in HTML5). span number It specifies the number of columns a colgroup should span. valign
- top
- middle
- bottom
- baseline
It specifies the vertical alignment of the column group. (Not supported in HTML5). width
- %
- Pixels
- relative_length
It specifies the width of the group of column. (Not supported in HTML5). Default CSS Settings
29.HTML <data> Tag
The HTML<data>tag is used to provide a machine readable version of its own contents. It displays the data in a special format.This element provides both a machine-readable value for data processors, and a human-readable value for rendering in a browser.Example:Attributes
Attribute Description value It is required attribute. It is used to provide the machine-readable version of tag's content. 30.HTML <datalist> Tag
The<datalist>tag specifies a list of pre-defined options for an <input> element.The<datalist>tag is used to provide an "autocomplete" feature for <input> elements. Users will see a drop-down list of pre-defined options as they input data.The<datalist>tag should be used with an <input< element that contains a "list" attribute. The value of "list" attribute is linked with the datalist id.Example:Default CSS Settings
31.HTML <dd> Tag
The
<dd>tag is used to describe a term/name in a description list.The
<dd>tag is used in conjunction with <dl> (defines a description list) and <dt> (defines terms/names).
Example:Default CSS Settings
32.HTML <del> Tag
HTML<del>tag is used to represent the range of text that has been deleted/removed from the document. Browsers will usually strike a line through deleted text.Example:Attributes
Attribute Value Description cite URL It specifies a URL of the resource which explains change or reason of deleting text. datetime YYYY-MM-DDThh:mm:ssTZD It specifies the date and time when text is deleted. Default CSS Settings
33.HTML <details> Tag
HTML <details> tag is specifies the additional details on the web page that the user can view or hide on demand.The<details>tag is often used to create an interactive widget that the user can open and close. By default, the widget is closed.The <summary> tag is used in conjuction with<details>to specify a visible heading for the details.Example:Attributes
Attribute Description open It specifies that the details will be displayed (open) to the user. Default CSS Settings
34.HTML <dfn> TagHTML<dfn>tag also called as HTML definition tag. It is used to represent the term which is defined within context of definition phrase or sentence in an HTML document.Example:Default CSS Settings
35.HTML <dialog> Tag
The<dialog>tag defines a dialog box or subwindow.HTML<dialog>tag is used to create a new popup dialog on a web page.Example:Attributes
Attribute Value Description open open Specifies that the dialog element is active and
that the user can interact with it36.HTML <dir> Tag
Not Supported in HTML5.
The<dir>tag was used in HTML 4 to list directory titles.The <dir> element is used with the <li> tags, and list of directories renders in bullets by default.Example:Attributes
Attribute Value Description compact compact It specifies that list should display smaller than normal. 37.HTML <div> Tag
The
<div>tag defines a division or a section in an HTML document.The
<div>tag is used as a container for HTML elements - which is then styled with CSS or manipulated with JavaScript.The
<div>tag is easily styled by using the class or id attribute.Example:Default CSS Settings
38.HTML <dl> Tag
The
<dl>tag defines a description list.The
<dl>tag is used in conjunction with <dt> (defines terms/names) and <dd> (describes each term/name).Example:Default CSS Settings
39.HTML <dt> Tag
The
<dt>tag defines a term/name in a description list.The
<dt>tag is used in conjunction with <dl> (defines a description list) and <dd> (describes each term/name).Example:Default CSS Settings
40.HTML <em> Tag
HTML<em>tag is used to stress emphasis the particular text within a sentence or phrase. The content inside is typically displayed in italic.A screen reader will pronounce the words in
<em>with an emphasis, using verbal stress.Example:Default CSS Settings
41.HTML <embed> Tag
The<embed>tag defines a container for an external resource, such as a web page, a picture, a media player, or a plug-in application.Note:Most browser No longer support Java Applets and plug-ins.Example:Attributes
Attribute Value Description height pixels It specifies the height of the embedded content src URL It defines the resource location of the embedded document. type media-type It specifies the MIME type. width pixels It determines the width of the embedded content. Default CSS Settings
42.HTML <fieldset> Tag
HTML<fieldset>tag is used to group the logically related fields/labels contained within an HTML form.The<fieldset>tag draws a box around the related elements.The <legend> tag is used with the<fieldset>element as a first child to define the caption for the grouped related fields.Example:Attributes
Attribute Value Description disabled disabled It specifies that all form controls within the fieldset element are disabled. form form_id It specifies the one or more form(s) to which fieldset controls belongs. name text It specifies the name associated with fieldset. It will not display at the browser and useful with JS. Default CSS Settings
43.HTML <figcaption> Tag
The<figcaption>tag is used to provide a caption to an image.The<figcaption>element is used with <figure> element and it can be placed as the first or last child of the <figure> element.Example:Default CSS Settings
44.HTML <figure> Tag
The
<figure>tag specifies self-contained content, like illustrations, diagrams, photos, code listings, etc.While the content of the
<figure>element is related to the main flow, its position is independent of the main flow, and if removed it should not affect the flow of the document.The <figcaption> element is used to add a caption for the
<figure>element.Example:Default CSS Settings
45.HTML <font> Tag
Not Supported in HTML5.
HTML <font> tag is used to define the font style for the text contained within it. It defines the font size, color, and face or the text in an HTML document.Example:Attributes
Attribute Value Description color rgb(X,X,X)
#xxxxx
color_nameIt specifies the color of the content. face font_family It specifies the typeface of the content. size number It specifies the size of the content. Note: Contact information inside a46.HTML <footer> Tag
HTML<footer>tag is used to define a footer for a document or a section.HTML<footer>tag contains information about its containing elements:
- authorship information
- copyright information
- contact information
- sitemap
- back to top links
- related documents
<footer>element should go inside an <address> tag.Example:Default CSS Settings
47.HTML <form> Tag
The<form>tag is used to create an HTML form for user input.An HTML<form>is a section of a document which contains controls such as text fields, password fields, checkboxes, radio buttons, submit button, menus etc.The<form>element can contain one or more of the following form elements:
Tag Description <form> It defines an HTML form to enter inputs by the used side. <input> It defines an input control. <textarea> It defines a multi-line input control. <label> It defines a label for an input element. <fieldset> It groups the related element in a form. <legend> It defines a caption for a <fieldset> element. <select> It defines a drop-down list. <optgroup> It defines a group of related options in a drop-down list. <option> It defines an option in a drop-down list. <button> It defines a clickable button. Example:The radio button is used to select one option from multiple options.It is used for selection of gender, quiz questions etc.Example:Checkbox Control:The checkbox control is used to check multiple options from given checkboxes.Example:Default CSS Settings
48.HTML <frame> Tag
HTMLNot Supported in HTML5.
<frame>tag define the particular area within an HTML file where another HTML web page can be displayed.The<frame>tag was used in HTML 4 to define one particular window (frame) within a <frameset>.Example:Attributes


| Attribute | Value | Description |
|---|---|---|
| frameborder | 0 1 | It specifies whether to display a border around the frame or not, and its default value is 1 |
| longdsec | URL | It specifies a page which contains the long description of the content of the frame. |
| marginheight | pixels | It specifies the top and bottom margins of the frame. |
| marginwidth | pixels | It defines the height of the margin between frames. |
| name | text | It is used to assign the name to the frame. |
| noresize | noresize | It is used to prevent resizing of the frame by the user. |
| scrolling | yes no auto | It specifies the existence of the scrollbar for overflowing content. |
| src | URL | It specifies the URL of the document which we want to display in a frame. |
49.HTML <frameset> Tag
Not Supported in HTML5.
<frameset> tag is used to contain the group of frames which can be controlled and styled as a unit. Example:
Attributes

| Attribute | Value | Description |
|---|---|---|
| cols | Pixels % * | It specifies the number and size of column spaces in the frameset. (Not Supported in HTML5) |
| rows | Pixels % * | It specifies the number and size of the rows spaces in the frameset. (Not Supported in HTML5) |
<h1> to <h6> tags are used to define HTML headings.<h1> to <h6> tags, from highest level h1 (main heading) to the least level h6 (least important heading).<h1> per page - this should represent the main heading/subject for the whole page.Example:
More Examples
Set the background color, text color and text alignment of heading with CSS:Example:Default CSS Settings
51.HTML <head> Tag
The
<head>element is a container for metadata (data about data) and is placed between the <html> tag and the <body> tag.Metadata is data about the HTML document. Metadata is not displayed.
Metadata typically define the document title, character set, styles, scripts, and other meta information.
Following is a list of tags used in metadata:
- <title>
- <style>
- <meta>
- <link>
- <script>
- <base>
Example:More Examples
The <style> tag, <base> tag and <link> tag goes inside<head>:Example:Example:Example:Default CSS Settings
52.HTML <header> Tag
HTML<header>tag is used as a container of introductory content or navigation links.Generally a<header>element contains one or more heading elements, logo or icons or author's information.Note:You can use several <header> elements in one document, but a <header> element cannot be placed within a <footer>, <address> or another <header> element.Example:Default CSS Settings
53.HTML <hr> Tag
HTML <hr>tag is used to specify a paragraph-level thematic break in HTML document.The<hr>element is most often displayed as a horizontal rule that is used to separate content (or define a change) in an HTML page.Example:More Examples
Set the height and width of a<hr> element with CSS:Example:Set the align of a <hr> element with CSS:Example:Default CSS Settings
54.HTML <html> Tag
The
<html>tag represents the root of an HTML document. It is a container of all elements (except <!Doctype> ) such as <body>, <head> and each element which appears in an HTML document.Before the
<html>tag we can only use <!Doctype> declaration which gives information about the HTML version to the browser.Example:Attributes
Attribute Value Description xmlns http://www.w3.org/1999/xhtml It specifies the XML namespace for
the document(Not required)manifest URL It specifies the URL of the
resource manifest indicates
resource which should be cached
locally.Default CSS Settings


55.HTML <i> Tag
The<i>tag defines a part of text in an alternate voice or mood. The content inside is typically displayed in italic.It can be useful to represent some technical terms, phrase, fictional character thoughts, etc.Example:Default CSS Settings
56.HTML <iframe> Tag
The
<iframe>tag specifies an inline frame.An inline frame is used to embed another document within the current HTML document.
Note: Use CSS to style the
<iframe>Example:Attributes
Attribute name Value Description allowfullscreen If true then that frame can be opened in full screen. height Pixels It defines the height of the embedded iframe, and the default height is 150 px. name text It gives the name to the iframe. The name attribute is important if you want to create a link in one frame. frameborder 1 or 0 It defines whether iframe should have a border or not. (Not supported in HTML5). Width Pixels It defines the width of embedded frame, and default width is 300 px. src URL The src attribute is used to give the path name or file name which content to be loaded into iframe. sandbox This attribute is used to apply extra restrictions for the content of the frame allow-forms It allows submission of the form if this keyword is not used then form submission is blocked. allow-popups It will enable popups, and if not applied then no popup will open. allow-scripts It will enable the script to run. allow-same-origin If this keyword is used then the embedded resource will be treated as downloaded from the same source. srcdoc The srcdoc attribute is used to show the HTML content in the inline iframe. It overrides the src attribute (if a browser supports). scrolling It indicates that browser should provide a scroll bar for the iframe or not. (Not supported in HTML5) auto Scrollbar only shows if the content of iframe is larger than its dimensions. yes Always shows scroll bar for the iframe. no Never shows scrollbar for the iframe. Default CSS Settings


57.HTML <img> Tag
<img> tag is used to display image on the web page. HTML img tag is an empty tag that contains attributes only, closing tags are not used in HTML image element.The <img> tag has two required attributes:
- src - Specifies the path to the image
- alt - Specifies an alternate text for the image, if the image for some reason cannot be displayed
Example:Attributes
Attribute Value Description alt text Specifies an alternate text for an image crossorigin anonymous
use-credentialsAllow images from third-party sites that
allow cross-origin access to be used with
canvasheight pixels Specifies the height of an image ismap ismap Specifies an image as a server-side image
maploading eager
lazySpecifies whether a browser should load an
image immediately or to defer loading of
images until some conditions are metlongdesc URL Specifies a URL to a detailed description of
an imagereferrerpolicy no-referrer
no-referrer-when-downgrade
origin
origin-when-cross-origin
unsafe-urlSpecifies which referrer information to use
when fetching an imagesizes sizes Specifies image sizes for different page
layoutssrc URL Specifies the path to the image srcset URL-list Specifies a list of image files to use in
different situationsusemap #mapname Specifies an image as a client-side image
mapwidth pixels Specifies the width of an image

More Examples
Example:Add a hyperlink to an image :Example:Default CSS Settings
58.HTML <input> Tag
The
<input>tag specifies an input field where the user can enter data.The
<input>element is the most important form element. The<input>element can be displayed in several waysThe different input types are as follows:
<input type="button"><input type="checkbox"><input type="color"><input type="date"><input type="datetime-local"><input type="email"><input type="file"><input type="hidden"><input type="image"><input type="month"><input type="number"><input type="password"><input type="radio"><input type="range"><input type="reset"><input type="search"><input type="submit"><input type="tel"><input type="text">(default value)<input type="time"><input type="url"><input type="week">Example:Attributes


| Attribute | Value | Description |
|---|---|---|
| accept | file_extension audio/* video/* image/* media_type | Specifies a filter for what file types the user can pick from the file input dialog box (only for type="file") |
| alt | text | Specifies an alternate text for images (only for type="image") |
| autocomplete | on off | Specifies whether an <input> element should have autocomplete enabled |
| autofocus | autofocus | Specifies that an <input> element should automatically get focus when the page loads |
| checked | checked | Specifies that an <input> element should be pre-selected when the page loads (for type="checkbox" or type="radio") |
| dirname | inputname.dir | Specifies that the text direction will be submitted |
| disabled | disabled | Specifies that an <input> element should be disabled |
| form | form_id | Specifies the form the <input> element belongs to |
| formaction | URL | Specifies the URL of the file that will process the input control when the form is submitted (for type="submit" and type="image") |
| formenctype | application/x-www-form-urlencoded multipart/form-data text/plain | Specifies how the form-data should be encoded when submitting it to the server (for type="submit" and type="image") |
| formmethod | get post | Defines the HTTP method for sending data to the action URL (for type="submit" and type="image") |
| formnovalidate | formnovalidate | Defines that form elements should not be validated when submitted |
| formtarget | _blank _self _parent _top framename | Specifies where to display the response that is received after submitting the form (for type="submit" and type="image") |
| height | pixels | Specifies the height of an <input> element (only for type="image") |
| list | datalist_id | Refers to a <datalist> element that contains pre-defined options for an <input> element |
| max | number date | Specifies the maximum value for an <input> element |
| maxlength | number | Specifies the maximum number of characters allowed in an <input> element |
| min | number date | Specifies a minimum value for an <input> element |
| minlength | number | Specifies the minimum number of characters required in an <input> element |
| multiple | multiple | Specifies that a user can enter more than one value in an <input> element |
| name | text | Specifies the name of an <input> element |
| pattern | regexp | Specifies a regular expression that an <input> element's value is checked against |
| placeholder | text | Specifies a short hint that describes the expected value of an <input> element |
| readonly | readonly | Specifies that an input field is read-only |
| required | required | Specifies that an input field must be filled out before submitting the form |
| size | number | Specifies the width, in characters, of an <input> element |
| src | URL | Specifies the URL of the image to use as a submit button (only for type="image") |
| step | number any | Specifies the interval between legal numbers in an input field |
| type | button checkbox color date datetime-local file hidden image month number password radio range reset search submit tel text time url week | Specifies the type <input> element to display |
| value | text | Specifies the value of an <input> element |
| width | pixels | Specifies the width of an <input> element (only for type="image") |
59.HTML <ins> Tag
<ins> tag defines a text that has been inserted into a document. Browsers will usually underline inserted text.Example:

Attributes| Attribute | Value | Description |
|---|---|---|
| cite | URL | It specifies the URL of the resource which explains the reason for the change. |
| datetime | YYYYMMDD HH:MM:SS | It specifies the date and time of change. |
More Examples
Use CSS to style <del> and <ins>:Example:Default CSS Settings60.HTML <kdb> Tag
HTML
<kbd>tag indicates the part of inline text which represents the user keyboard input, voice input, or any other text entry device input.The
<kbd>text renders on the browser in default monospace font.Tip: This tag is not deprecated. However, it is possible to achieve richer effect by using CSS (see example below).
Also look a:
Tag Description <code> Defines a piece of computer code <samp> Defines sample output from a computer program <var> Defines a variable <pre> Defines preformatted text


Example:
More Examples
Use CSS to style the <kdb> element:
Example:Default CSS Settings61.HTML <label> Tag
The <label> tag is used to specify a label for an <input> element of a form. It adds a label to a form control such as text, email, password, textarea etc.Note: The for attribute of<label>must be equal to the id attribute of the related element to bind them together. A label can also be bound to an element by placing the element inside the<label>element.Example:Attributes
Attribute Value Description for element_id Specifies the id of the form element the
label should be bound toform form_id Specifies which form the label belongs to
Default CSS Settings


62.HTML <legend> Tag
HTML<legend>tag is used to insert a title or caption to its parent element such as <fieldset>.Example:Attributes
Attribute Value Description align
- top
- bottom
- left
- right
It specifies the alignment of the caption. More Examples
The fieldset caption float to the right with CSS:
Example:Default CSS Settings63.HTML <li> TagThe
<li>tag defines a list item.All lists may contain one or more list elements. There are three different types of HTML lists:
- Ordered List or Numbered List (ol)
- Unordered List or Bulleted List (ul)
- Description List or Definition List (dl)
In <ul> and <menu>, the list items will usually be displayed with bullet points.
In <ol>, the list items will usually be displayed with numbers or letters.


Example:Attributes
Attribute Value Description value number Only for <ol> lists. Specifies the start
value of a list item. The following list
items will increment from that numberMore Examples
Set different list style types with CSS:Example:
More complex nested list:Example:


64.HTML <link> Tag
HTML<link>tag is used to specify the relationship between the current document and external source.The
<link>tag is most often used to link to external style sheets or to add a favicon to your website.The
<link>element is an empty element, it contains attributes only.Example:Attributes
Attribute Value Description charset char_encoding It defines the character encoding of linked source. href URL It specifies the location of the linked document. hreflang language_code Specifies the text language of linked source. media media_query It specifies the media, for which linked source is applied. rel
- alternate
- author
- dns-prefetch
- help
- icon
- license
- next
- pingback
- preconnect
- prefetch
- preload
- prerender
- prev
- search
- stylesheet
It describes the relationship between the current document and linked document. (required) rev reversed
relationshipIt describes the relationship between the linked document and the current document. (Not supported in HTML5) sizes Height* weight It specifies the size of the linked source. It should be only used with rel="icon." target _blank
_self
_top
_parent
frame_nameIt determines where to load the linked document. type media_type It specifies the media type of document.


65.HTML <main> Tag
The<main>tag specifies the main content of a document.The <main>tag is written within <body> tag. It is used to accurately describe the primary content of a page.It should not contain any content that is repeated across documents such as sidebars, navigation links, copyright information, site logos, and search forms.Note: There must not be more than one<main>element in a document. The<main>element must NOT be a descendant of an <article>, <aside>, <footer>, <header>, or <nav> element.Example:More Examples
Use CSS to style the <main> element:
Example:


66.HTML <map> Tag
The<map>tag is used to define an image map. An image map is an image with clickable areas.where you can click on the image, and it will open to new or the provided destination.The <map>tag can consist of more than one <area> elements which define the coordinates and type of the area.Example:Attributes
Attribute Value Description name mapname It defines the name of the image-map.
Default CSS Settings


67.HTML <mark> Tag
HTML <mark> tag is used to highlight the some text part inside of another element such as paragraph, for reference or any notation purpose.Example:

Default CSS Settings
68.HTML <meta> Tag
The <meta> tag defines metadata about an HTML document. Metadata is data (information) about data.
<meta> tags always go inside the <head> element, and are typically used to specify character set, page description, keywords, author of the document, and viewport settings.
Metadata will not be displayed on the page, but is machine parsable.
There is a method to let web designers take control over the viewport, through the <meta> tag (See "Setting The Viewport" example below).
Example:

Attributes
Attribute Value Description charset character_set It specifies the character encoding of an HTML page. content text It contains the value of the attribute "name" and "http-equiv" in an HTML document, depending on context. http-equiv - Content-type
- default-style
- refresh
It specifies the Information given by the web server about how the web page should be served. name - application-name
- author
- description
- generator
- keywords
It specifies the name of document-level metadata. scheme format/URL It specifies the scheme in which metadata is described.
More Examples
The different uses of meta tag:
<meta charset="utf-8">It defines the character encoding. The value of charset is "utf-8" which means it will support to display any language.
<meta name="keywords" content="HTML, CSS, JavaScript">
It specifies the list of keyword which is used by search engines.
<meta name="description" content="Free online tutorials">
It defines the website description which is useful to provide relevant search performed by search engines.
<meta name="author" content="Amit Agarwal">
It specifies the author of the page. It is useful to extract author information by Content management system automatically.
<meta http-equiv="refresh" content="50">
It specifies to provide instruction to the browser to automatically refresh the content after every 50sec (or any given time).
<meta name="viewport" content="width=device-width, initial-scale=1.0">
It specifies the viewport to control the page dimension and scaling so that our website looks good on all devices. If this tag is present, it indicates that this page is mobile device supported.
Default CSS SettingsNone.
69.HTML <meter> Tag
The <meter> tag used to measure data within a given range. It defines a scalar measurement with range. It is also known as a gauge.Examples: Disk usage, the relevance of a query result, etc.
Note: The <meter> tag should not be used to indicate progress (as in a progress bar). For progress bars, use the <progress>tag.
Example:Attributes
Attribute Value Description form form_id Specifies which form the <meter>
element belongs tohigh number Specifies the range that is considered to
be a high valuelow number Specifies the range that is considered to
be a low valuemax number Specifies the maximum value of the
rangemin number Specifies the minimum value of the
range. Default value is 0optimum number Specifies what value is the optimal
value for the gaugevalue number Required. Specifies the current value of
the gauge
Default CSS Settings
None.

70.HTML <nav> Tag
The
<nav>tag defines a set of navigation links.Notice that NOT all links of a document should be inside a
<nav>element. The<nav>element is intended only for major block of navigation links.Example:Default CSS Settings71.HTML <noframes> Tag
Not Supported in HTML5.
The<noframes>tag was used in HTML 4 to act as a fallback tag for browsers that did not support frames.The<noframes>tag should be used within <frameset> element.Example:72.HTML <noscript> Tag
The<noscript>tag defines an alternate content to be displayed to users that have disabled scripts in their browser or have a browser that doesn't support script.The <noscript> element can be used within <head> and <body> tags.When used inside <head>, the<noscript>element could only contain <link>, <style>, and <meta> elements.
Example:


Default CSS Settings
None.73.HTML <object> Tag
HTML<object>tag is used to embed multimedia files on webpage.The external resource can be a web page, a picture, a media player, or a plug-in application.If you insert text between the <object> and </object> tags, then it will only be displayed if the browser does not support the<object>tag.Plug-ins
The
<object>tag was originally designed to embed browser Plug-ins.Plug-ins are computer programs that extend the standard functionality of the browser.
Plug-ins have been used for many different purposes:
- Run Java applets
- Run ActiveX controls
- Display Flash movies
- Display maps
- Scan for viruses
- Verify a bank id
Example:An embedded image:An embedded video:Attributes
Attribute Value Description data URL It specifies the address of the resource. type content_type It determines the content type of the resource specified by data. archive URL It specifies the space-separated list of URL's for archives of resources for the object. border pixels It sets the width of the border around the <object>. classid URL It specifies the URL for the object implementation. codebase URL It specifies the base path where to find the code for the object. form form_id It specifies the form element that the object element is associated with. height pixels It defines the height of the object. width pixels It determines the width of the object. typemustmatch boolean It specifies that resource should be embedded if type attribute matches with the actual content type of the resources provided on the data attribute. name name It defines the name for the object.
Default CSS Settings74.HTML <ol> Tag
The
<ol>tag defines an ordered list. An ordered list can be numerical or alphabetical.The<li> tag is used to define each list item.
Note: For unordered list, use the <ul>tag.
Attributes
Attribute Value Description reversed reversed Specifies that the list order should
be reversed (9,8,7...)start number Specifies the start value of an
ordered listtype 1
A
a
I
iSpecifies the kind of marker to use
in the listMore Examples
Example:Set different list types with CSS:Default CSS SettingsReduce and expand line-height in list with CSS:75.HTML <optgroup> Tag
HTML<optgroup>tag is used to group related <options> in a drop down list within <select> element.If you have a long list of options, groups of related options are easier to handle for a user.Example:
Attributes
Attribute Value Description disabled disabled Specifies that an option-group
should be disabledlabel text Specifies a label for an option-group
Default CSS SettingsNone.
76.HTML <option> Tag
The
<option>tag defines an option in a select list.
<option>elements go inside a <select>, <optgroup, or <datalist> element.Note: The
<option>tag can be used without any attributes, but you usually need the value attribute, which indicates what is sent to the server on form submission.
Example:
Attributes
Attribute Value Description disabled disabled If it is set then that option will be disabled. label text It defines the name for the list item. selected selected If it is set, then it will be selected by default in the list. value text It specifies the data which is sent to the server. More Examples
Example:Use of <option>in a <datalist> element:
Default CSS SettingsNone.


77.HTML <output> Tag
The<output>tag is used to represent the result of a calculation (like one performed by a script).Example:
Attributes
Attribute Value Description for element_id It specifies the list of other element's ids which indicates the relationship between the result of the calculation and the input elements. form form_id It specifies the form element to which this element is associated with. name name It defines the name for the output element.


78.HTML <p> Tag
The<p>tag defines a paragraph.An HTML<p>tag indicates starting of new paragraph.Browsers automatically add a single blank line before and after each<p>element.Example:More Examples
Example:Align text in a paragraph with CSS:Style paragraphs with CSS :Poem problems in HTML:


79.HTML <param> Tag
The<param>tag is used to define parameters for an <object> element.We can use more than one<param>tag within an <object> element in any order.Example:
Attributes
Attribute Value Description Name text It determines the name of the parameter. value text It determines the value of the parameter. type content_type It specifies the media type of the parameter, and it only used if the valuetype is set to "ref." valuetype
- data
- ref
- object
It determines the type of the value attribute.


80.HTML <picture> Tag
HTML<picture>tag is used in responsive web designing where we need to load the different images based on their viewport, height, width, orientation, and pixel density.The<picture>element contains two tags: one or more <source> tags and one <img> tag.Note: The<picture>element works "similar" to <video> and <audio>. You set up different sources, and the first source that fits the preferences is the one being used.Example:
Attributes
Attribute Value Description media media_query It defines and accept any media query which can be defined in CSS. srcset URL It defines the URL of the image which can be used for different situations. type video/ogg
video/mp4
video/webM
audio/ogg
audio/mpegIt determines the MIME type src URL It specifies the location of the image.

81.HTML <pre> Tag
The
<pre>tag defines preformatted text.Text in a
<pre>element is displayed in a fixed-width font, and the text preserves both spaces and line breaks. The text will be displayed exactly as written in the HTML source code.Example:More Examples
Pre-formated text width fixed width
Attributes

No comments:
Post a Comment
If you have any doubts, Please let me know